
You can join in this Hexalong at any time and use the templates I am using or just do your own hexagons. The starter post for the HAL is here. Share anything you make in the Lily's Quilts Flickr Group.

EPP is English Paper Piecing. Once you have mastered this simple technique, you can use it for the whole of this HAL.
1. Cut one large hexagon into templates. Here I have cut three diamonds to make a tumbling block.
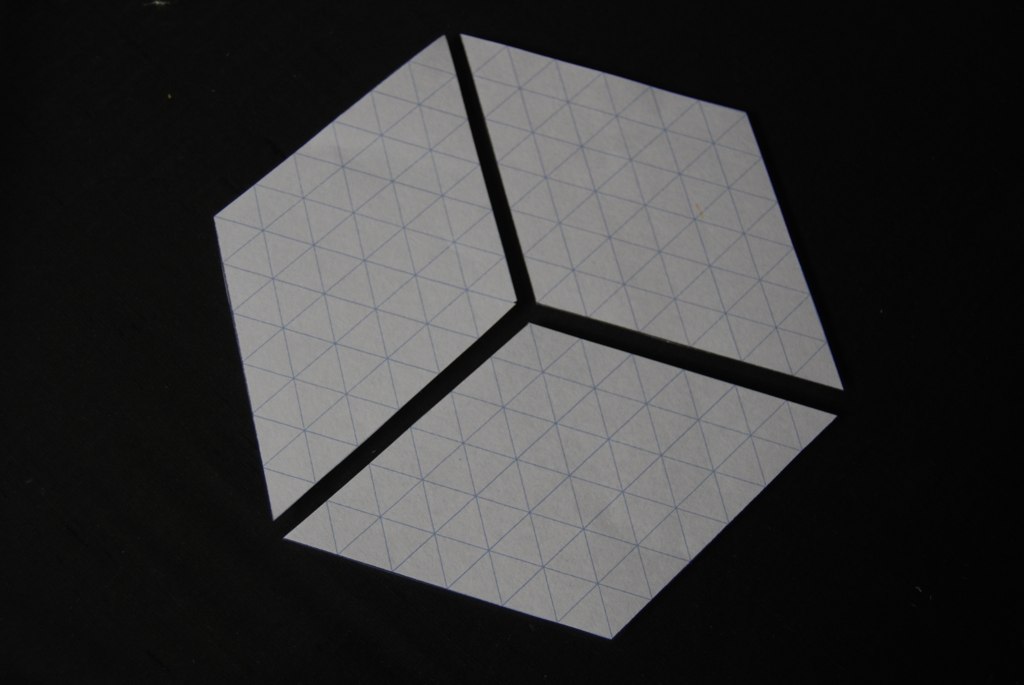
2. Choose fabrics for the three segments. This block works well with a dark, medium and light fabric of the same sort of colour so it looks 3D.

3. Grab a hold of your dorky portable sewing bag or box. Mine contains thread, some quilt basting needles, pins and scissors: paper scissors for cutting the templates, fabric scissors for cutting the fabrics and little embroidery scissors for snipping threads. Mine also contains a little rubbish bin for bits of fabric and thread. I slide paper templates down the side of the bag.

I use quilt basting needles which are long and very thin but use whichever needles suit you. I use Aurifil 50wt thread.

4. Pin one of the paper templates to one of your fabrics. Hold up to the light if you are fussy cutting.

5. Cut around the template aiming for a rough seam allowance of somewhere between 1/4" and 1/2".

6. Fold the edges of the fabric over the edges of the template and baste with long basting stitches. I sew all the way through the paper and fabric. I do not glue but some people do and swear by it. Some people sew just through the fabric and not the paper but I prefer sewing right through the whole lot. My stitches tend to be about an inch long. If you would like a video demonstration of the basting, let me know.


7. Once you have basted all the sections for a pieced hexagon, pin two pieces together, rights sides together, aligning the corners and edges.

8. Now sew along the edge of this seam. I secure with a double stitch at the start of the seam then sew what I think is called a whipstitch, where you sew a long line of stitches each looping in from the same side. I sew about 8-10 stitches per inch. If you would like a video demonstration of this stitch, let me know.


9. When you come to the third piece in this block, stitch along one edge then flip, re-align the seams for the next edge and stitch along there.
10. And voila, you have your first EPP pieced hexagon. You can do some of your hexagons by just using the whole of the large hexagon template, uncut.


11. When you get to the point where you sew all these hexagons together, you do that in exactly the same way as sewing two sections of a block together here.
12. As sections and hexagons are completely surrounded by other ones, you can remove the basting stitches and slip out the paper templates. These can be re-used over and over.

EPP is English Paper Piecing. Once you have mastered this simple technique, you can use it for the whole of this HAL.
1. Cut one large hexagon into templates. Here I have cut three diamonds to make a tumbling block.
2. Choose fabrics for the three segments. This block works well with a dark, medium and light fabric of the same sort of colour so it looks 3D.

3. Grab a hold of your dorky portable sewing bag or box. Mine contains thread, some quilt basting needles, pins and scissors: paper scissors for cutting the templates, fabric scissors for cutting the fabrics and little embroidery scissors for snipping threads. Mine also contains a little rubbish bin for bits of fabric and thread. I slide paper templates down the side of the bag.

I use quilt basting needles which are long and very thin but use whichever needles suit you. I use Aurifil 50wt thread.

4. Pin one of the paper templates to one of your fabrics. Hold up to the light if you are fussy cutting.

5. Cut around the template aiming for a rough seam allowance of somewhere between 1/4" and 1/2".

6. Fold the edges of the fabric over the edges of the template and baste with long basting stitches. I sew all the way through the paper and fabric. I do not glue but some people do and swear by it. Some people sew just through the fabric and not the paper but I prefer sewing right through the whole lot. My stitches tend to be about an inch long. If you would like a video demonstration of the basting, let me know.


7. Once you have basted all the sections for a pieced hexagon, pin two pieces together, rights sides together, aligning the corners and edges.

8. Now sew along the edge of this seam. I secure with a double stitch at the start of the seam then sew what I think is called a whipstitch, where you sew a long line of stitches each looping in from the same side. I sew about 8-10 stitches per inch. If you would like a video demonstration of this stitch, let me know.


9. When you come to the third piece in this block, stitch along one edge then flip, re-align the seams for the next edge and stitch along there.
10. And voila, you have your first EPP pieced hexagon. You can do some of your hexagons by just using the whole of the large hexagon template, uncut.

Or you can cut up the hexagon in any way you can think of.

11. When you get to the point where you sew all these hexagons together, you do that in exactly the same way as sewing two sections of a block together here.
12. As sections and hexagons are completely surrounded by other ones, you can remove the basting stitches and slip out the paper templates. These can be re-used over and over.
Whe I first read about the HAL I knew that it was going to be beyond me. Too hard, I am a novice after all. but now, I see your step by step and I think, I could do that! Now I need to give it some thought, and maybe I will join in. Maybe :-)
ReplyDeleteHi Lynne! I would really love video demonstrations of basting and sewing a long the seam whenever you get a chance - I am completely new to EPP so I want to make sure I'm doing it right. Thank you for a great tutorial though!
ReplyDeleteHow did you piece that last hexie? It's fabulous! What size are these? (did you already answer that question yesterday? sorry...)
ReplyDeleteI have paper pieced hexagons on smaller blocks, and wasn't sure if it would turn out nicely with the larger blocks, too. Thanks for showing us that it works both ways.
ReplyDeleteI use a stiffer paper for my EPP. Index card or manila folder weight is perfect and will fit through your printer. I just remembered that someone gave me some large vintage hex blocks, which I had planned to someday use in a quilt. I'll take a photo and post on Flickr, but I'm not sure I'll get to use them anytime real soon, because I have some other projects that I must complete before starting something new.
ReplyDeleteThank you for such a great tutorial, Lynne. Your explanation and pictures make things really clear and easy to understand.
ReplyDeleteyour tutorials are so precise. Thank you. I still haven't tried, but I did download and print the graph paper. Step 1! Did I just imagine this or did you say you are also going to do a machine piecing tutorial? If that happens then I will be all over this project. Still deciding on fabrics. Thanks for all you do.
ReplyDeleteGreat instructions Lynne. This is almost exactly what I'm doing on my blue and red hexie quilt. I would add that I don't knot my basting stitch. I start with a short backstitch, then baste around with large stitches, and end at the first stitch. This holds well, and is also easy to remove.
ReplyDeleteI'm also working on a EPP compass rose block. For this one I'm using a ladder stitch (http://www.youtube.com/watch?v=5CjOXMuTFXo). It takes longer, and requires more focused attention, but the result is an unbelievably crisp seam. I'm also using freezer paper and starching and pressing the seam allowances, which I'm not so crazy about, as it turns out,
Instructions are loud and clear: thanks!
ReplyDeleteThis is the best explanation of EPP I've seen in my searches. Thanks also for showing that you don't just need to cover the entire hexi! That's brilliant! I have started an ongoing project for myself using hexi's, where I cover one hexi with material I ahve used in all my sewing projects. am hoping to build a flower garden of memories. :D
ReplyDeleteHi Lynne,
ReplyDeleteI made my first hexagon last night using Gayle's point to point tutorial. This project is going to be so much fun! Thanks for starting this Hexalong, I love the look of all your variations on the hexagon.
I love the idea of EPP'ing some of these hexies, Lynne. One of your swirly-twirly ones, to be exact!
ReplyDeleteI am amazed at the EPP process. Since I'm not doing the HAL, I'm storing up the tips for the future. The brilliant idea I can currently put to use is the rubbish bin in my sewing caddy. I always toss loose threads in but then I have to sort through later. Smart you are.
ReplyDeleteI've been EPP hexies off and on for about 5 years now. It IS addicting and is a fabulous way to relieve stress... as I understand it, as your hands are working their fine motor skills...you use the opposite side of the brain than emotions...therefore, you are able to think, work things out that may trouble you, all without emotions taking over. EPP helped me through a most trying time in my past. Think about it...try and EPP while you crying at the same time. Impossible! If you would start to feel a deep emotion, your hands would instinctively become still. Not to be a downer, no crying now for me here. It just fascinated me and I wanted to share, as tough times come to us all at some point in our lives! I've recommended it to friends at troubling times.
ReplyDeleteI also use the ladder stitch and I've tried both. I use it exclusively for EPP as it is absolutely invisible for me, which I prefer. Laura of Ruby Grey Studio