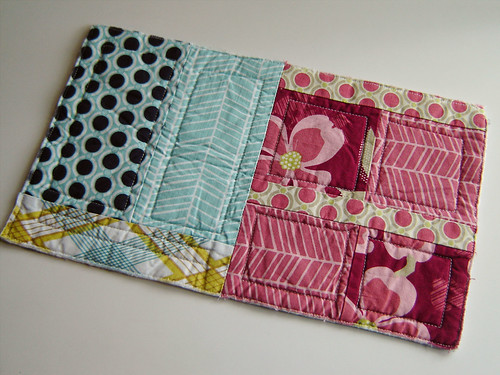
To us, one of the scariest parts of a QAYG approach to quilt construction is how to join all those blocks without making a hot mess. Would the quilt have lumpy seams? Would the batting wad up into bumps?
One method is to leave the off the backing while you quilt the front and batting together. Then you sew together the front/batting blocks and add the backing at the end. This allows you to have a continuous backing piece but the quilting from the front will not show on it. Penny at sewtakeahike has a tutorial for this method here.
Some methods use strips applied with, or without, additional batting between the QAYG blocks. The strips can be wide or skinny and add an interesting design element to the quilt. Marianne at The Quilting Edge has tutorials here and here. Sew We Quilt @ Stash Manicure has a tutorial here. Monica at the Happy Zombie has a tutorial here.
Another interesting approach is to bring the backing fabric to the front between the QAYG blocks and use it as a sashing. There is a video by Penny Halgren showing this method here. This tutorial from Mary Ann at Rocknquilts, explains how to join the batting with an iron-on tape specially designed for batting. This idea is intriguing, but we are not certain that it would work easily in a tight spot and it requires you to purchase the special iron-on tape.
Marci and I wanted a slightly different result. We wanted:
- a clean join on the front seam without adding any kind of design element to the front or the back of the quilt,
- the batting securely joined so it would not shift into a lump,
- as little hand sewing as possible,
- no bulky seam from sewing the front and the batting together,
- the quilting to show on the back of the quilt.
Here is our approach:
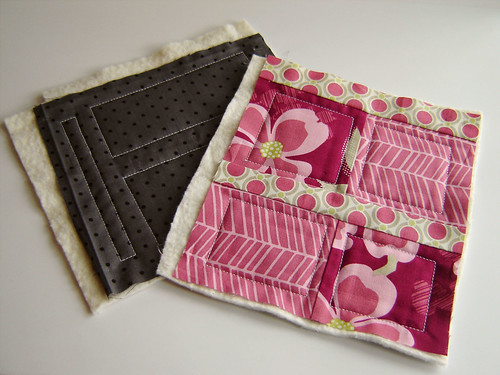
Quilt your blocks with the backing fabric in place. Make sure your back fabric and batting are larger than the front block. This gives you something to hang onto while you quilt and the extra for the joining of the blocks later. Leave about 1 inch unquilted at the edges of the front fabric.
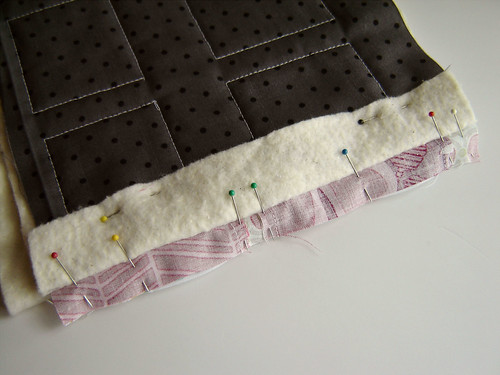
Align the two blocks and place them right sides together. Fold and pin the batting and backing fabric out of the way. If your fronts are out of line, trim them. Stitch your front fabric, right sides together with a 1/4 inch seam.
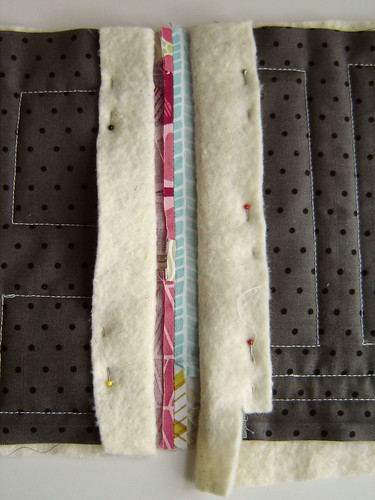
Press open the front seam. Be careful to use a heat setting on your iron suitable for your batting.
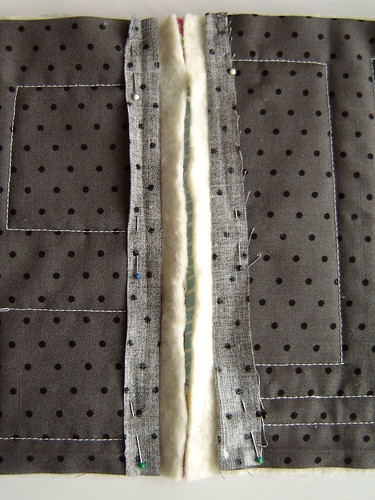
With the back of the blocks facing you, lay the piece flat and pin back the backing fabric. Carefully trim the batting with scissors so that when it is lying flat both sides of the batting touch but do not overlap. Perfection is not required here, batting is forgiving.
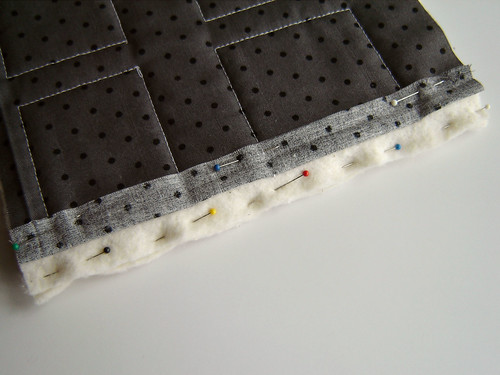
Fold the blocks, right sides together. Push the seamed front fabrics into the fold and pin them out of the way. Pin the batting together.
Sew the batting together using a blanket stitch (l_l_l_l_) or a short zig zag (vvvvvv). Stitch slowly so that the needle goes into the two pieces of batting on one side and goes over the edge of the batting into nothing on the other side.
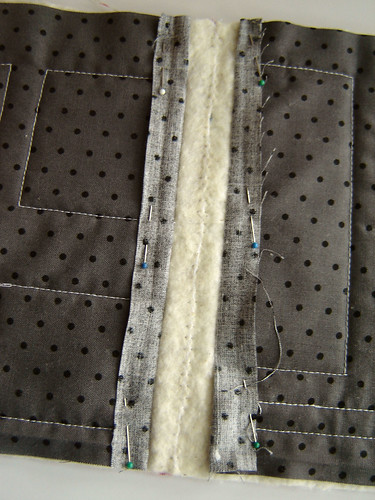
When you are done, open the seam and smooth the batting or give it a very gentle tug to flatten it out. The idea is similar to a flatlock that you can do with a serger. You may want to test this out on some scrap pieces of batting to get the best size of stitch to achieve this with your sewing machine.
The goal is to secure the pieces of batting together without creating an overlap or lumpy seam.
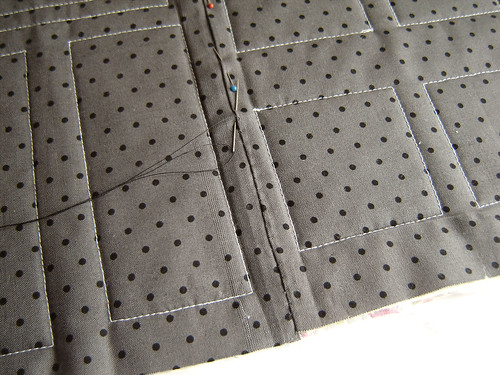
The last step matches some of the tutorials mentioned earlier. Trim the backing fabric if needed so that the pieces overlap about 1/2 inch when smoothed out. On one side, fold and iron under 1/4 inch of backing fabric. You may want to hang one side over the ironing board to make this easier. Then place the back fabric with the turned-under side on top, smooth, pin and hand sew it in place. Go back to our first photo, that shows this sample after it was finished, washed and dried.
Repeat for all your blocks, horizontally row by row and then vertically row by row.
We are going to use this method on our huge Dresden blocks from Lily's Quilts QAL. If you decide to give this a try, let us know how it works out.
Best,
Leanne and Marci

Wow, I think I'm going to have to give this a try sometime, looks pretty neat!
ReplyDeleteThanks so much Lynne for giving Leanne and I the opportunity to share our findings on your lovely blog!
ReplyDeleteThanks for the very clear pictures and description!
ReplyDeleteI've used that method before and it works a treat. However, it doesn't help the bunch of us who are making only one block.
ReplyDeleteWill that quilting technique show up fairly soon? I'm wanting to see how that circular quilting is done like on the very first sample. I spose it will be just to FMQ in concentric circles, huh?
Thanks for the tutorial! QAYG has been high on my to do list for quite some time now. I need all the help I can get!
ReplyDeleteThis certainly looks doable. I had bookmarked another QAYG tutorial (for future use) that I thought was perfect, from http://quiltingtwin.blogspot.com/2009/02/mereth-found-this-pile-of-qayg-blocks.html, but it requires the addition of a strip. That's fine if I want that design element, but I like that your method does not require the strip. I don't mind a little hand sewing, it's very relaxing.
ReplyDeleteGreat tutorial
ReplyDeleteI first saw QAYG sewn like this by a lady called Carolyn Forster who has a book on the subject "Quilting-On-The-Go"
It's a very informative book and also has some lovely
Patterns
Chris x
this looks very labor intensive but also looks like it will achieve a perfect junction.
ReplyDeleteomg I always wondered.
ReplyDeleteI've just sewn some samples, maybe nah..
just changed my mind!!
x
this is great! thanks for the tutorial!
ReplyDeleteGreat post....really informative, there`s so many ways to do all this stuff.
ReplyDeleteGreat tutorial! Guess I'd better catch up!
ReplyDeleteI love this! I will be trying this one out.
ReplyDeleteI think I'll be giving this one a go, if I ever get to that stage... Really good tutorial by the way, so easy to follow.
ReplyDeleteA great tutorial, great photos and explanations, but i'm not sure whether I'll do mine that way, if I ever get to that stage, Im still sewing the blades.
ReplyDeletei am still only up to the cutting but am hoping to get to this stage over the weekend and can't wait to give this try!! It will give me some more hand sewing to do on the train :)
ReplyDeleteAnd, I love this fabric! Do you know/remember what it is?
ReplyDeleteLovely neat job - and you don't end up with a contrasting fabric strip joining the blocks together on one of the sides if you are using different materials between the front and back
ReplyDeleteNicely done - thanks!
ReplyDeleteThis is wonderful! I'm just a beginner when it comes to traditional quilting and making small pieces can be less intimidating and more convenient to work on.
ReplyDeleteBrilliant! Now I don't feel quite so threatened by the big hole my dog left in my son's quilt. I can use your method to patch it.
ReplyDeletethis is an interesting solution. i'll have to give it a try :)
ReplyDeletewhat a great tutorial! have to admit that i never understood the technique of qayg but now i do - yay!! and i love your method.. i checked out the other ones around on the net and have to say i certainly will try yours soon and first :-)
ReplyDeleteagain, thanks so much for enlightening me ladies!!
claudia
Hola! Gracias por el Tutorial! Se ve muy buena su técnica! Sólo una pregunta: cómo hace para que la costura de unión del bateo no se vea en el frente? Muchas gracias nuevamente!
ReplyDeleteAh, I have often pondered instructions in books and not really `got it`. I read this post once and it made perfect sense. Now I can confidently try this, thankyou.
ReplyDeleteI use this method on a large quilt with lots of freemotion motifs. It works great! Thank you!
ReplyDeleteSusanne
Thank you for mentioning my QAYG method with tape on your blog post. One advantage to the tape is that after you have trimmed your batting, you simply iron it on and it is very quick. An alternative would be to hand sew. The QAYG method is wonderful for quilters with hand injuries or for someone with a small sewing machine. Mary Ann @ RocknQuilts.blogspot.com
ReplyDeleteClever! How have I not seen this before.??
ReplyDeleteMan, I'm so mad that I didn't find your blog before today. I've been going batty trying to figure out how to join blocks for a quilt as you go thing I'm doing. Mine look like...well...they look not good. Thanks for the tut! I'll try it this way.
ReplyDeleteAlso, I LOVE the fabrics you used.
This is so cool, I will be trying this very soon. Thanks for all of the links to the other turorials, you guys are awesome.
ReplyDeleteYour tutorials are among my favorites. Thank you so very much for sharing your amazing talent.
ReplyDeleteThank you!!! Best instructions I've found - finally makes sense of what to do with the "top" when you're dealing with the bat!!! I appreciate your time in posting this for us!
ReplyDeleteCindy