

Hi! I'm Sarah from {no} hats in the house. Having entered Lynne and Michael's "Made with Oakshott" challenge almost every month since I started blogging earlier this year, I can quite honestly say I was over the moon when an email popped up in my inbox in August asking for my address. And so the story begins...

Like many modernitional quilters out there, I have a soft spot for traditional blocks. Especially "new" ones I haven't seen before. This project, "daydreams + 'shott{ing} stars," features just that: a traditional shooting star-esque block I happened upon while browsing my well-worn copy of Barbara Brackman's Encyclopedia over a cup of Numi tea a while back. But you're not here to hear about my morning ritual, are you? ...Didn't think so.
00 Fine print.
The official block name is Century of Progress — Star Arcturus, BB #3713. (Unofficially, to me it looks like a shooting star, so I'm going to call a spade, well, ...you know). I've outlined this two-sided design in eight steps (below). In addition to the usual suspects (rotary cutter+mat, ruler, needle, thread, patience, starch, printer+paper, seam ripper... and so on), you'll need to download and print (at 100%!) the free block templates (available to craftsy users here, and to all other crafty folks here). Use scant ¼" seams throughout. And finally, please feel free to email (or comment) with any questions you might have!
01 Pair up fabrics.

The two tops require at least four different fabrics (15 counting the oakshott shades separately):
1 yard light, "daytime" sky fabric (add an extra ½ yard if you plan to fussy-cut a directional print, which is what I did for my text prints)
1 yard dark, "nighttime" sky fabric (again, you'll need a total of 1½ yards if you don't use an allover-type print like twinkle twinkle and/or care about the orientation of the fabric)
1 oakshott fat 8ths pack for star-trail fabric (the sample ever-so-kindly sent by Michael and Lynne was shot with blues—the "midnight" bundle—, but really any pack will shine so long as it has at least 12 hues)
⅗ yard star fabric of your choosing
Additionally, you'll need—at a minimum—a 42" x 54" piece of batting (more if you include optional sashing and/or borders), and 250" of prepared binding (again, more if your quilt extends beyond the 3x4 12" block layout). Mine, for instance, finished up around 42" x 55" (think naptime/bedtime).
02 Prep fabric.
Non-washers out there can just mosey on down to step 03 below. But if you're like me and happen to be a pre-washer, go on and prep other fabrics per your usual routine, but DO NOT WASH (!) the oakshotts pack: the measurements are spot on (as in, the-stars-have-aligned) for 12" blocks when preshrunk, but only if there isn't too much fray (which is pretty hard to avoid when such modest pieces are thrown willy nilly in the wash). The fat 8ths in my pack measured around 9¾" x 23½" upon arrival. After shrinking them, the length didn't noticeably change but the width decreased by about ½".
So fend off the fray using this pre-shrinking process for each fat 8th: unfold fabric, iron, spend ten minutes running around the house searching for an empty spray bottle, ask yourself whether your iron has a built-in spray function (most do), use said function to spray fabric with water, press (as opposed to iron), spritz fabric with starch or starch alternative, press (yes, again), repeat with remaining shades, and go ahead and make a mental note to add a color catcher to the quilt's first wash.
03 Cut fabric.

skies
night (allover)
—cut three 8½" strips, then sub cut 9½" sections to yield twelve 8½"x9½" rectangles. Cut six of the rectangles in two using template a4, and remaining six using template b4.
—cut two 5" strips, then sub cut twelve 5" squares. Using template a5 or b5, cut all twelve squares on the diagonal to yield twenty-four HSTs.
day (fussy cut)
—cut four 13½" strips, then sub cut twelve 13½" squares. Cut a 5" square from upper left corner of each larger square, then line up the mirrored sky templates along the lower left (a4) and upper right (b4) edges (they should fit snugly in their respective corners). Cut a5 and b5 from the square piece along diagonal shown above. Set aside leftovers.
stars
—cut 10 2⅛" strips, then sub cut 144 diamonds using the a6 template.
oakshott "star-stripes"
—Trim each fat 8th to 8½" wide. Set aside leftover strips.
—Line up nine pattern templates (three each of a1+2+3 or b1+2+3)* in the above-illustrated sequence. Cut. Sew ends together along straight edge, press, and cut remaining set of three "trails" 1+2+3.
*NOTE: Because oakshotts have no "wrong" side, you'll only need the straight "a" templates or the mirrored "b" templates, not both.
04 Plan blocks.
Each fat 8th yields twelve rocket-star beams (four each of templates 1+2+3, half of which will need to be reversed). That's enough for two blocks' worth, so you'll get to mix and match 24 sets of stripes in all (12 "day," 12 "night"). The only tricky part here is that the pieces cut from the pieced end-sections (the last three) will not be reversible, so keep that in mind.
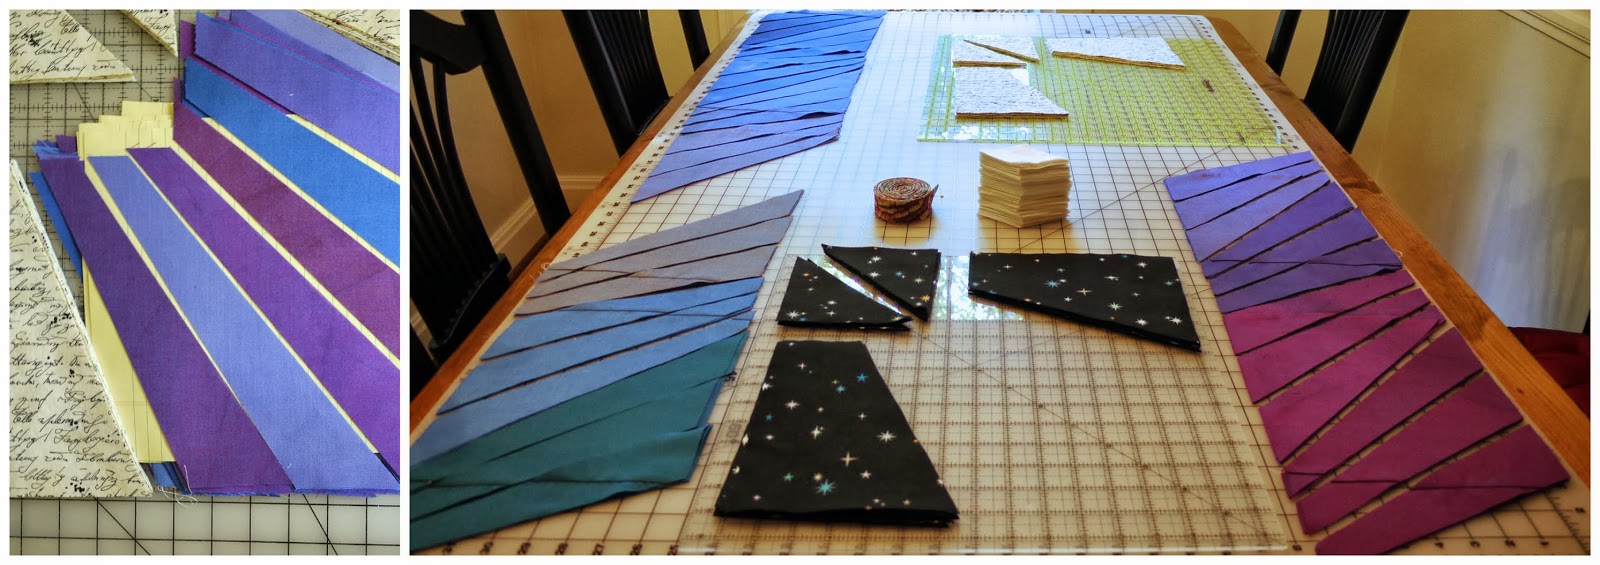 |
| (I separated each six-strip pairing with sheets of paper to stay organized.) |
05 Piece blocks.

After finalizing layout decisions, sew oakshott-trail template piece a2 to a1 (ensuring "dog ear" ends overlap by about ¼"), then a3 to a2, and a4 to a1. Repeat with b-templates. Press. Add a5, lining up outer edges. Repeat with b5. Press. Pin a-half to b-half, and sew along diagonal. Press. Retrieve pressed block from sneaky toddler. Add optional border (see 06 below). Piece star by machine or hand. Press star and prepare for applique (outer edges of machine-pieced stars may be basted using template a7). Center star in upper left quadrant, using the center seam and edges of the square as a guide. Applique. Cut away overlapping sky/'shott fabric and set aside. Repeat. Etc. ;)
06 Plan tops.

*As you can see in this collage, I mirrored my day/night blocks by tilting the night stars 90 degrees clockwise.*
I don't have a design wall, so I use a combination of EQ7 and free collage software (think pic monkey) to get a feel for layout ideas and sashing needs. I went into this project convinced I'd skip any sashing and stitch the finished blocks side-by-side, but having gotten a little carried away with my last quilt I guess it should come as no surprise that some elements of those sashing and borders trickled over into these tops. So I used a 1" postage stamp strip sash paired with a skinny ¼" block border. Whatever you decide, be consistent so that your two tops turn out to be the same size!

07 Add finishing touches.
If you've opted to tilt one side's blocks (here, the nighttime sky), any block-specific quilting on the front should line up with the back. To help that result, I actually spray-basted one top to the batting, then used oversized pins to frame each corner of the first basted top so I knew precisely where to baste the other top when I flipped it over.
08 Do a little star dance, in matching star pants.
{Can you tell we're big on Dr. Seuss at the moment? :)}
 |
| ...Shout out to Saks and Carters for apparently sharing star-pants style notes. And to my two superstar helpers ;) |
I cannot thank Michael and Lynne enough for letting me play with such fine fabrics. I have to say I really loved watching these star-filled skies come to life. I'd tell you my wish is that I've managed to spark your interest in these brilliant textiles, but I know you were crushin' before reading this. Besides, I think we all know a far better wish would be something along the lines of a lifetime supply of oakshotts... :D
Thanks again to Lynne for having me and to Michael for (promptly!) supplying the goods.
—Sarah
This is amazingly beautiful! And Oakshotts are fabulous, aren't they?
ReplyDeleteP.S. Your star pants are quite stunning as well.
Awesome tute Sarah! Your quilt looks spectacular!
ReplyDeleteJust gorgeous shooting stars, I also like the tights!!!
ReplyDeleteAbsolutely beautiful, what a great idea!
ReplyDeleteLove this quilt - just gorgeous and great pics!
ReplyDeleteMy 3 year old pointed at the screen and said "Wish Upon A Star quilt mummy!" Think that says it all - perfection :)
ReplyDeleteMy brain would just about explode trying to match up two quilt tops!
ReplyDeleteLooks excellent though x
I already went nutso over this over on flickr, but I love this quilt so much, I have to continue fawning over it here! This is so gorgeous!! LOVE IT.
ReplyDeleteBeautiful, amazing, I love it.
ReplyDelete