
Hi all, my name is Nati and I blog over at Nati's Little Things. And I am delighted that Lynne chose my post suggestion for her Project on a budget series. This is a great series in which we are asked to make something purchasing all the materials for less than £20. So here's what I made with the lovely supplies from Abakhan fabrics.

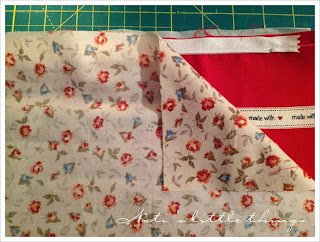
I used a combination of three fabrics, red and flowers for the small pouch and flowers and white for the larger pouch. The small pouch fits nicely even an e-reader and the bigger pouch has a wider opening so it even fits the smaller pouch!

What will you need?
- Scarlet red poplin 100% cotton;
- White poplin 100% cotton;
- Matching print fabric for lining and details (link to the one I used here)
- 1 meter of "made with ♥" ribbon
- 2 zips, a 20cm and a 30cm
- Thick iron-on interfacing.
Both pouches are put together following the same simple steps. The instructions below are for the smaller pouch.
Step 1 - Cut two pieces of the outer fabrics. Make sure they are a little bit wider than the zip and to the desired length. My pieces were 20cm by 30cm (8 x 12 inches approximately). Cut the lining pieces to match the outer pieces.
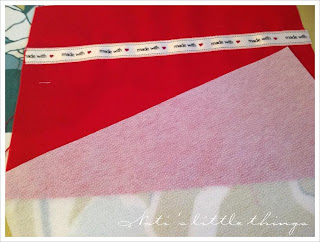
Step 2 - The front piece has been embellished with the "made with ♥" ribbon. In order to do that line the ribbon in the desired height of the outer fabric (make sure you take into account 1/4 seam allowance at the top for the zip).

Then run two lines of stitches (I used red thread) as close as possible to the edge of the ribbon as in the picture below.

Finally iron the interfacing to the back of the front pieces to ensure they have a nice sturdy texture.
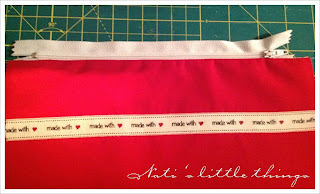
Step 3 - Now you are ready to start constructing the pouch.The way of sewing the pouch is to attach the front pieces (both outer and lining fabrics) to the zip first and then proceed to the back pieces. You can do it in one step or two (I use two). First line the outer front fabric right side up and the zip right side down on the top edge. Pin and sew using a zipper foot. Try to get the stitching close to the teeth of the zip.

Step 4 - Line the front lining fabric right side down on top of the front outer fabric (right side up). Sew again using the same seam allowance.
Step 5 - Turn fabrics wrong sides together and iron well, you can also run a line of decorative stitches to avoid the zip getting caught.
Step 6 - Repeat steps 3-5 for the back outer fabric and lining, see pictures below.

Step 7 - Now lay your fabrics flat, outer fabrics right sides together and lining fabrics as well. and sew around the whole rectangle. Make sure the zip is half way open. Pay especial attention when you are running over the zip first not to catch the metal end bit and that it lines as nicely as possible. Leave an opening in the lining for turning around.
Step 8 - In order for the pouch to have a little base, line the side and bottom seams in both corners and run a line of stitches at the desired length from the corner as the width of the desired base. Clip the excess of fabric.
Step 9 - Turn right side out, iron well, poke corners out, sew the lining opening close, and voilà you have a lovely looking pouch (be aware, making pouches can become addictive!).

Hope you enjoyed the tutorial... I have made a little changes in the tutorial for the bigger pouch, if you are interested don't forget to stop by Nati's Little Things for more details!

I used a combination of three fabrics, red and flowers for the small pouch and flowers and white for the larger pouch. The small pouch fits nicely even an e-reader and the bigger pouch has a wider opening so it even fits the smaller pouch!
What will you need?
- Scarlet red poplin 100% cotton;
- White poplin 100% cotton;
- Matching print fabric for lining and details (link to the one I used here)
- 1 meter of "made with ♥" ribbon
- 2 zips, a 20cm and a 30cm
- Thick iron-on interfacing.
Both pouches are put together following the same simple steps. The instructions below are for the smaller pouch.
Step 1 - Cut two pieces of the outer fabrics. Make sure they are a little bit wider than the zip and to the desired length. My pieces were 20cm by 30cm (8 x 12 inches approximately). Cut the lining pieces to match the outer pieces.
Step 2 - The front piece has been embellished with the "made with ♥" ribbon. In order to do that line the ribbon in the desired height of the outer fabric (make sure you take into account 1/4 seam allowance at the top for the zip).
Then run two lines of stitches (I used red thread) as close as possible to the edge of the ribbon as in the picture below.
Finally iron the interfacing to the back of the front pieces to ensure they have a nice sturdy texture.
Step 3 - Now you are ready to start constructing the pouch.The way of sewing the pouch is to attach the front pieces (both outer and lining fabrics) to the zip first and then proceed to the back pieces. You can do it in one step or two (I use two). First line the outer front fabric right side up and the zip right side down on the top edge. Pin and sew using a zipper foot. Try to get the stitching close to the teeth of the zip.
Step 4 - Line the front lining fabric right side down on top of the front outer fabric (right side up). Sew again using the same seam allowance.
Step 5 - Turn fabrics wrong sides together and iron well, you can also run a line of decorative stitches to avoid the zip getting caught.
Step 6 - Repeat steps 3-5 for the back outer fabric and lining, see pictures below.
Step 7 - Now lay your fabrics flat, outer fabrics right sides together and lining fabrics as well. and sew around the whole rectangle. Make sure the zip is half way open. Pay especial attention when you are running over the zip first not to catch the metal end bit and that it lines as nicely as possible. Leave an opening in the lining for turning around.
Step 8 - In order for the pouch to have a little base, line the side and bottom seams in both corners and run a line of stitches at the desired length from the corner as the width of the desired base. Clip the excess of fabric.
Step 9 - Turn right side out, iron well, poke corners out, sew the lining opening close, and voilà you have a lovely looking pouch (be aware, making pouches can become addictive!).
Hope you enjoyed the tutorial... I have made a little changes in the tutorial for the bigger pouch, if you are interested don't forget to stop by Nati's Little Things for more details!
What a gorgeous set of pouches :-) Well done on winning and thank you for the tutorial!
ReplyDeleteGreat tutorial - as it happens I just bought some Kaffe fabric and coordinating zippers with the intention to make some pouches - this might work out quite well for some of that fabric.
ReplyDelete