And now the second post in the Quilt Math series. Calculating sashing. How much fabric do you need to sash your quilt? Before we get started, here's a button for your blogposts or sidebar.

<div align="center"><a href="http://lilysquilts.blogspot.co.uk/2012/09/quilt-math-1-2-3.html" title="Lily's Quilts Math"><img src="https://blogger.googleusercontent.com/img/b/R29vZ2xl/AVvXsEifKp1cBaIWIYq-meiodx2ZnK56dvJPn_2EH26EgxUmgMp11kukqZotBoDY4nL7pjpWNRi6BfmHgzXHi4delMQqOe_zZISBAADO3JVOlSYB07znPKXbeqEdLwFPsOZ64yahMMlHvf9w9keP/s170/QMB.png" alt="Lily's Quilts Math" style="border:none;" /></a></div>
I am going to show you the process of calculating sashing on a simple quilt and you can use the same process for any quilt. I should say that I always use WOF strips for sashing and do not cut strips from the length of the fabric. Some quilters prefer to use the length of the fabric for the final sashing on a quilt as it is less stretchy and so less likely to become flappy. But my calculations are all based on sashing using WOF strips.
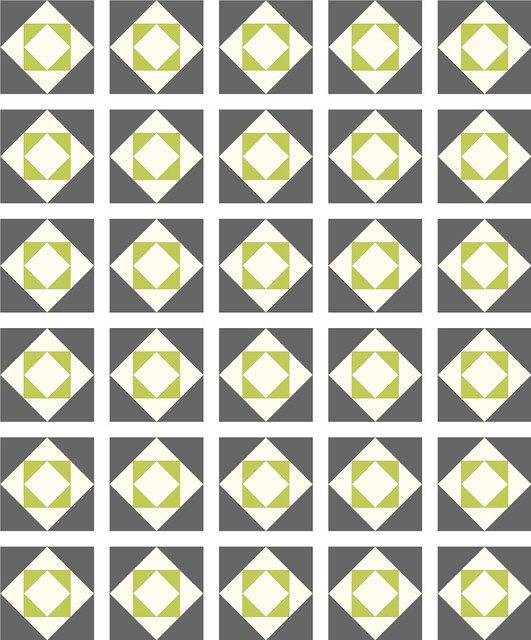
1. My imaginary quilt is made up of 30 12" blocks arranged in a 5 x 6 formation. If you draw these out on a graphics program or a piece of paper, it is much easier to count how many elements of sashing you will need at each step.

STEP 1
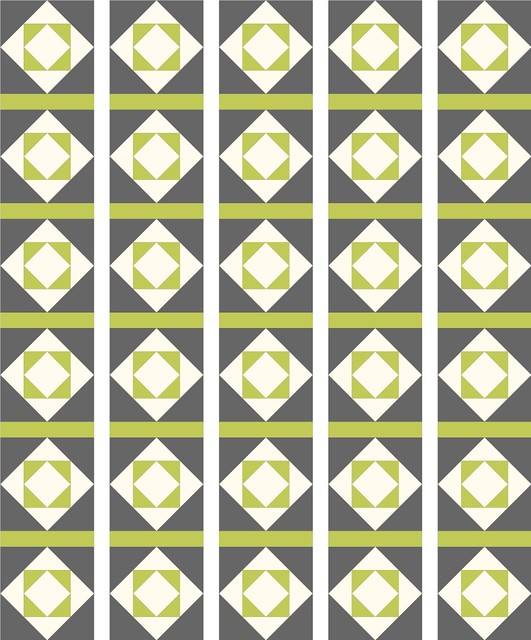
2. Firstly, we will have the individual short strips of sashing shown in green in the picture below. Since a finished block 12" block is 12 1/2" wide at this stage, the strips will need to be 12 1/2" long.
3. I am sashing this quilt with 2" finished sashing so the strips will need to be cut 2 1/2" wide.
4. I do not have joins in small sashing strips so I first need to calculate how many 12 1/2" lengths can be cut from 44" wide fabric. Since 3 x 12.5" = 37.5", I can cut three lengths from each WOF strip I cut.
5. If I count up the sashing strips I have drawn in my diagram, I can see that there are 25. If I divide 25 by the number of strips I can cut per WOF, I get 8.33 so, rounding up, I need 9 WOF strips for this stage.
6. Since my sashing is going to be 2 1/2" wide, I will need 9 x 2.5" so 22.5" for the first round of sashing.

STEP 2
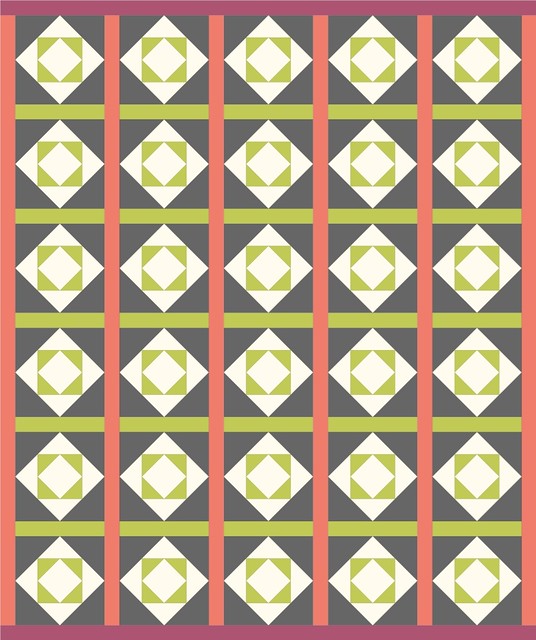
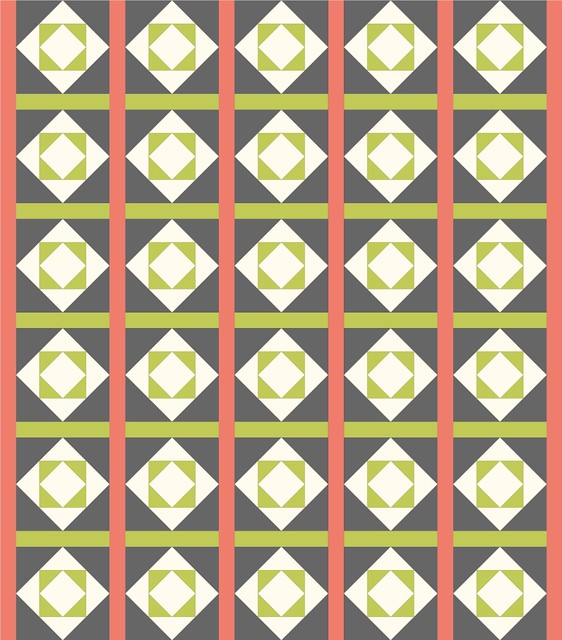
7. Next I am going to calculate the long vertical sashing I will use to join the strips of blocks together, show in orange in the picture below.
8. To calculate the length of these, I will need to multiply 6 x 12" since I have six rows of 12" blocks PLUS 5 x 2" since I have five rows of 2" sashing. 6 x 12" = 72" PLUS 5 x 2" = 10". 72" + 10" = 82".
9. Since 82" is the FINISHED length of this part of the quilt, I will need to add a 1/4" to each end as those edges are as yet unfinished. So I will need lengths of sashing 82 1/2" long. As these are longer than 44", I will be joining WOF strips end to end to make these.
10. Counting on my diagram, I need six of these so I multiply 6 x 82.5" = 495". Divide by 42" (44" wide fabric minus a bit for washing, selvedges and seams). 495" ÷ 42" = 11.78. Round up to 12. So we will need 12 WOF strips for the orange sashing strips.
11. Since my finished sashing will be 2" wide, I need to cut 12 WOF strips 2 1/2" wide. To calculate how much fabric is needed for this stage of the process, multiply 12 x 2.5" = 30"
12. So far, we need 22.5" for step 1 PLUS 30" for step 2.
STEP 3
13. The final step is to calculate how much fabric we need for the top and bottom sashing strips on the quilt, show in the diagram below in pink.
14. To calculate the length of these, we need to add together the five 12" blocks and the six 2" sashing strips. So 5 x 12" = 60" PLUS 6 x 2" = 12". 60" + 12" = 72". Don't forget you still have two unfinished edges on the left and right sashing strips so add two 1/4" (i.e. 1/2") for those.
15. So we need 72 1/2" for each pink sashing strip. 2 x 72.5" = 145". Divide that by 42" to see how many WOF strips we will need. 145" ÷ 42" = 3.45. Round that up to four WOF strips.
16. Since the finished sashing is 2", we will need 2 1/2" WOF strips. So 4 x 2.5" = 10".

FINAL CALCULATION
17. So the sum of the green, orange and pink sashing is 22.5" for step 1 PLUS 30" for step 2 PLUS 10" for step 3. 22.5" + 30" = 10" = 62.5".
18. To calculate how many yards or metres of fabric we need to buy, divide by 36" for yards and 39" for metres.
Yds: 62.5" ÷ 36" = 1.74. So 1 3/4 yds.
Metres: 62.5" ÷ 39" = 1.60. So 1.6 metres or perhaps 1 3/4 metres to be on the safe side!
I'd probably buy 2yds or metres in practice - it's always good to have a bit spare for mistakes! Once again, I'd love to know if you do the calculations in the same way or have a much better and quicker way of doing them. And please ask any questions. Either in the comments or by email (see "contact LQ" at the top of the page) if you'd prefer.


Great going Lynne (I guess this shows the mathematical mind of a quilter getting to grips with sorting/writing out patterns) - way to go girl
ReplyDeletegreat to see it laid out this way. I would work it out in the same way, But having decided that 2 yards is needed i would cut the long sashing pieces from the length of fabric (no seaming needed) and cut the short sashing from the remainder of the fabric.
ReplyDeleteSounds right to me. I'd probably do it the same way.
ReplyDeleteI would add that things change if you decide to fussy cut or otherwise take advantage of the design on the fabric. It doesn't really change the math though.
That's exactly how I do it and how I show my students - phew! And I always use WOF too.
ReplyDeleteThat's how I do it! The one extra thing I do is work out where to join the long sashing strips so that the join coincides with an existing join (i.e. where the block meets the short sashing strips) but I don't usually do this until I'm attaching the sashing as I always buy a little extra (as you recommend!) just in case I make a stupid mistake and to allow for shrinkage when I pre-wash the fabric. I love quilt maths - makes my heart sing ;o)
ReplyDeleteI'm about the same, like Helen too, but with the linen I usually use it has an incredible width, so I don't usually have to join my verticals, which is mighty handy.
ReplyDeleteIf I have really good yardage but narrower WOF, then I go LOF ...
btw ... I just mentioned you in my Ada Lovelace Day post, in celebration of lady nerds.
Great quilting math post. Very clear and concise. (Added benefit, I love the look of the quilt, too.)
ReplyDeleteUmm you don't want to know what I do. You don't want to know how I messed up maths wise at least 4 times this afternoon. Really you don't!
ReplyDeleteExactly what Sheila said in this example or smaller quilt; and as I have never sashed bigger than 72" I can't say more, although I would probably put in a WOF join or too if it were larger. Like a nice bit of wide-arse'd Klona too.
ReplyDeleteI have to do this quite often for customers at the QS where I work... Exactly like this but would also suggest cutting the long sashings first.. It helps with strength if the quilt is to be hung vertically for a show or on display as a large hanging.
ReplyDelete