
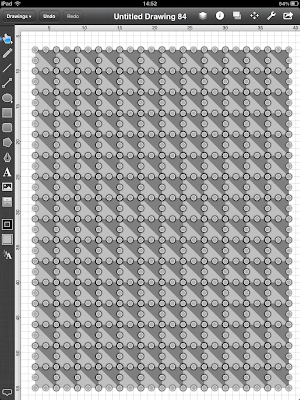
For anyone who missed previous posts, Touchdraw is an iPad app I chanced on a few weeks ago which has enabled me to design quilts, headers, buttons, labels and more. It is cheap, easy to use and, it seems to me, endlessly versatile. If you are a beginner, make sure you try out the first tutorial first to get yourself started as I will assume that everything I taught you in that one has been learned for this one but please ask questions if you get stuck. As before, before starting I will make sure I am working in inches. And here is what we will be drawing.

1. We are going to be working with half square triangles (HSTs) and the golden rule for Touchdraw is that you can only colour it in if it is a shape, not a series of lines so it is not enough to draw a square then add a diagonal line; we actually have to draw HSTs. But Touchdraw have done it for us so it's pretty easy. Go and grab one from the filing drawers in the side toolbar - filed away under "shapes" and described as a "right triangle". Tap on the filing drawers.

2. Tap on "Shapes" and then on the "Right Triangle" to select it.

3. Tap anywhere on your screen to make it appear. You can then remove its border line if you want and change the colour it is coloured in with if you want.

4. Then, by dragging the corner points, you can change it to any size or shape of triangle but I have enlarged mine to a 3" HST.

5. Next select it by tapping on it, tap on the dialogue box on the bottom of the side toolbar and duplicate the shape.

6. Select one of the triangles and rotate it 180 degrees by tapping on the adjustment menu on the top toolbar.

7. Then tap on "Rotate 180".

8. You will now have a square made of two HSTs.

9. Select one and change its colour using the Fill menu in the side toolbar.

10. Now we are going to group these two HSTs together into one object so we can duplicate it several times and move it around. First select both shapes (by holding your finger on the side toolbar between the letters and the dialogue box and tapping on each shape until both are highlighted) and then tap on the Arrangement icon in the top toolbar which looks like two sheets of paper.

11. Then tap on "group" and the object will become one shape which can be moved, duplicated, rotated as one item.

12. Duplicate the square 11 times and align them all into one line by dragging them around the screen with your finger.

13. Go to the dialogue box at bottom of the side toolbar and tap on "Select All". All of the squares will not be selected.

14. Repeat the process at steps 10 and 11 to group them all into one object.

Duplicate three times and align.

15. Once again, select all, group and duplicate three more times and align to make a whole quilt of HSTs.

16. Now select all and tap on "ungroup" several times until it is no longer an option.

17. Tap outside the quilt so that everything is unselected then once again select all, go back to the arrangement icon (two sheets of paper) and select "lock". All the dots will turn to grey and you are no longer able to move your triangles or re-size them.

18. Once again tap outside the quilt area so that all the triangles are unselected and now we will have fun colouring the quilt in. With one finger press and hold the part of the toolbar between the dialogue box until it turns red, continue to hold it as you tap on all the triangles you want to colour in the first colour (I have chosen a load at random).

19. Pick a fill colour for them from the wheel, list or favourites in the fill icon and all those triangles you selected will change colour.

20. Carry on adding colours.

21. Once you have all the colours you want, you can think about the borders you might want to add (if any).

22. Next time I will show you how to add borders quickly and easily and for those of you who want to give it a go now, draw a filled rectangle so it covers the whole quilt, tap "move to back" from the arragements menu and then move and re-size to fit. Keep adding borders until you're happy with the finished drawing.

Let me know if you're learning along with these tutorials, it's fun for me to know and add pictures to the Lily's Quilts Flickr group so I can see what you're doing!
I so want to buy me an iPad so I can follow along with these tutorials. It looks so fun! :O)
ReplyDeleteThank you for all the work you have put into this. I am so loving my iPad! And now, I'm going to draw, thanks to you!
ReplyDeleteDo you think this app would be good for designing paper piecing?
ReplyDeleteI have just bought the app, can't wait to have a go!
ReplyDeletei want an ipad! and an iphone!
ReplyDeleteAwesome tutorial!
ReplyDeleteI'm with Carol and Nicke!! Great tutorial, even for someone who is ipadless!
ReplyDeleteGreat tute again Lynne. For anya, I use this partly for paper piecing patterns but I do all my flipping and cutting into sections on photoshop by emailing the files to myself. Hope that helps
ReplyDeleteGreat tutes again!! I have now managed to draw 2 things using your instructions. I'm going to get cocky now and try a design of my own! Back shortly to cry over my failure ;)
ReplyDeleteWoohoo! About to go try some HST designs! Thanks Lynne, I actually feel like I kind of know what's going on with touch draw now :-)
ReplyDeleteYes I'm learning so much from your TD tutorials. Thank you
ReplyDeleteThanks! I'll put my sewing aside and try it now!
ReplyDeleteWith each tutorial you give, I'm thinking that I may just scrap EQ and get Touchdraw. It looks so intuitive. Thanks Lynne!
ReplyDeleteThese tutorials are great! Haven't been able to sit and play too much but it's definitely on my list of things to do. Not on Flckr but I'll let you know when i come up with something good. :-)
ReplyDeleteAwesome! Finally found time to play!
ReplyDeleteHey Lynne, I followed both your tutorials over the weekend and managed to design two quilts - thanks so much for taking the time to write them. I shall upload to Flikar soon :-) I look forward to the next installment!
ReplyDeleteLove your tutorials! I would never have figured out how to multi-select. Thanks!
ReplyDeleteOne thing I need to know is how to delete elements, ie if you have one row too many and realise when it's too far down the line to undo.
ReplyDeleteTo duplicate multiple items you can use paste and then specify the number of items and location whic might be quicker than duplicate for a quilt of repeated blocks.