
Having made your templates, here is how you make the triangles. For each one, you will need a 5" scrap for the central triangle, a couple of 2 1/2" WOF strips for the background and a couple of 1" WOF strips for the skinny strips. And do you like my little graphic I made?! Touchdraw for iPad again. I'm like the technology queen now I have this app. I'm graphically unstoppable.
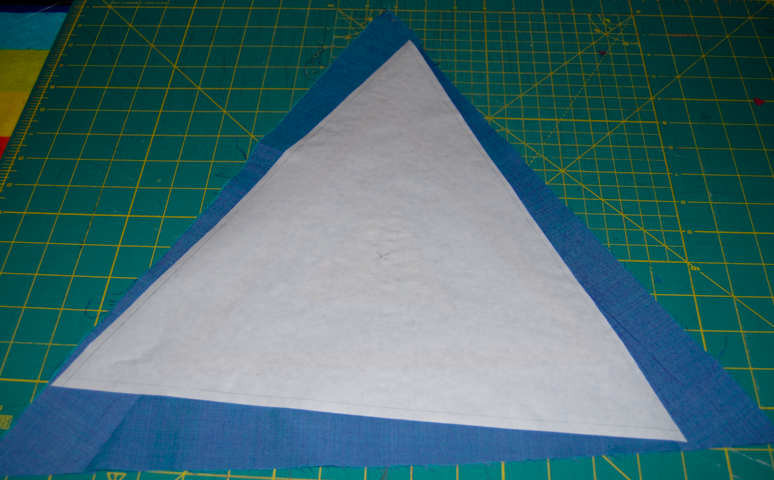
 1. Press the smallest triangle freezer template to a 5" square of fabric (or other scrap). I am using charm squares of Cosmic Burst by Mark Cesarik. Trim by aliging the 1/4" line on your ruler with the pencil 1/4" line on the template and trim. The reason for the aligning with the 1/4" line is that, without it, you trim to the edge of the template, often take a little slither off accidentally and, by the end of the project, the template is smaller than when you started.


2. Cut a couple of WOF strips of background fabric 2 1/2" wide. I am using a selection of Oakshott shot cottons for the background and skinny strips. Sash the triangle and trim.

3. Take the 10" template, press onto the triangle at a wonky angle. Hold up to the light to check that the edges of the new triangle remain at least 1/2" away from the edges of the first triangle.

4. Trim, again aligning the 1/4" line on your ruler with the 1/4" line on the template.

5. Cut a couple of WOF strips 1" wide of the skinny strip fabric (here dark purple). Sash the triangle and trim.

6. Sash again using the background 2 1/2" WOF strips.

7. Press the 15" triangle template on at a wonky angle, again holding it up to the light to check that the edges of the new triangle are at least 1/2" away from the edges of the previous triangle.
8. Trim again aligning the 1/4" line on your ruler with the 1/4" line on the template.

9. Sash once more with the skinny strip 1" WOF strips and voila you have finished one of your copa cabana triangles.

What you do with them is up to you. I have yet made no specific plans for mine - I'm just going with the flow. If you do make any, let me know and add them to my Flickr group so I can see them. And any suggestions as to what to do with mine would be great please.
Now that I see your instructions, this block looks pretty easy and fun to make. I'm sure I can squeeze in some time to make a few.
ReplyDeleteBy the way, I like your tip about aligning the 1/4" seam line with the 1/4" marking on the ruler to ensure that the edges of the template are not accidentaly trimmed off.
Looking really good Lynne
ReplyDeleteCome on keep going and make a quilt with them ;o)
Oh thanks Lynne - they're not quite as scary to make as I thought they would be :o)
ReplyDeleteThey look fab Lynne
ReplyDeleteLooking forward to seeing what these all turn into! BTW, I'm fully expecting to see you Copa Cabana dance at the FQ Retreat, complete with Carmen Miranda head dress... ;o)
ReplyDeleteThis is such a good idea - Lynne you're a flaming genius!!
ReplyDeleteThese are wonderful, thank you for the explanation. I'll give one a try tonight. They would make a fun quilt.
ReplyDeleteLove the triangle block and thanks so much for the tutorial! it's fab!
ReplyDeleteThanks for the tutorial! I'm totally trying these!
ReplyDeleteI just keep thinking about the old TV show Triangle, Larry Lamb, Jonathan Scott Taylor - eye-candy in the eighties!
ReplyDeleteThanks for the tutorial. Will add it to my bookmarked list. =D
ReplyDeleteHi,
ReplyDeleteI have never thought of trying triangles. You could get some quite good optical illusions with those if the right colours are used.
Best wishes from the UK.
So much fun. I would piece them together point up/point down/point up/point down...etc. into rows for a riot of triangles quilt. We have a satirical political commentator here in Canada called "Max Pointy". Since these are big triangles, all I can think of now is a Max Pointy quilt!
ReplyDeleteI can't wait to see a finished quilt with these! Just wanted to say, also, that that tip, where you use a quarter inch line so you don't continually trim slivers off your pattern is just brilliant! Love it!
ReplyDelete