
The starter post for this Dead Simple QAL is here and please feel free to join at any time. I would love to see links to blogposts, palette and progress pics so please upload all of these to my Flickr group. And now we are going to sort out the quilt layout. There are lots of different ways to do this - putting all your squares on a design wall or on the floor or on a sheet or on the bed. Once your squares are laid out, ask friends or family for their input, take photos and look at the layout on your computer screen, look at the layout through the wrong end of a pair of binoculars.

The quilt I am making in this QAL is made of 25 FQs each cut into twelve charm squares. I cut all the prints without very geometrical designs on the Baby Go Cutter using the charm square die.

Fold your FQs into six, lay them on the cutter and, hey presto, you have twelve charm squares. This is a quick and easy way to cut a lot of fabric. I cut the stripes and geometric dots on the cutting mat though to ensure that the alignment was bang on.

Given that my quilt will be made up of 300 charm squares, organising and keeping track of a layout pattern would be difficult. So I decided to sew the charms into blocks of 25. There will be twelve of these squares and I will put a charm from each FQ into each of these blocks. Since I find random placement very hard to do, I devised a dorky way of placing these charms in a random-seeming manner. I drew up a series of sudoku squares where each of the numbers 1 to 5 appear in one column and in one row. I assigned a colour to each number and then placed the charm squares in the order marked on the sudoku.

I then sewed the charms into rows, pressing the seams in each row in alternate directions so that the seams nest when the rows are sewn together. If you are a real beginner quilter on this project, grab a few scraps, cut them into 5" squares and make nine patches until you are pretty confident that your cutting, seam allowance and seam matching are pretty accurate. I pin the points where may seams match and find this helps with the seams meeting although some people prefer not to pin. I am also not excessively fussy about every single seam meeting to perfection - that decision is up to you but try to keep the piecing process enjoyable and you may not find it as enjoyable if you are unpicking more than sewing!

This gives me one block of 25 charms and I will make eleven more of these to make the finished quilt. Here is a mock-up I made of the finished quilt - I made a mosaic in big huge labs and inserted the original block twelve times but rotated in different directions.
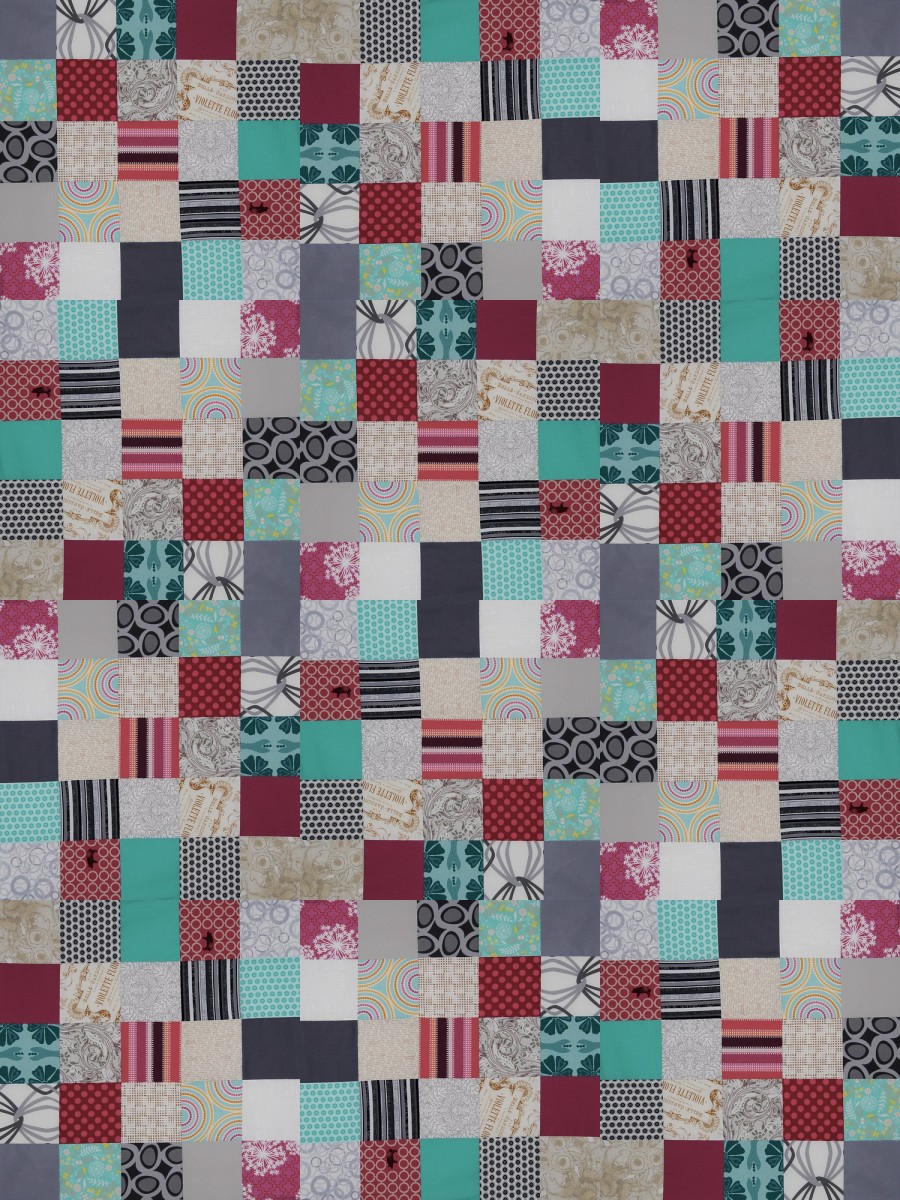
The original idea for this quilt was the romantic notion of quilts being made in days of yore made up of squares cut from old sheets, shirts, dresses and other scraps of fabric from family life that were too worn to be any use as clothing any more. But of course, I don't have a pile of beautifully matching, 100% cotton, partially worn and used, old shirts, sheets and dresses so my fabrics were bought for the purpose and hand picked by Peg and Becca from Sew Fresh Fabrics for me. But I am still happy that the mock-up mosaic I made gives me the same scrappy, random, made-from-old-scraps feel that I was looking for but also pulls the colours from one limited palette. I can't wait to see how you all put this quilt together - whether you go random or more planned or make a different quilt altogether with your palette fabrics.

The quilt I am making in this QAL is made of 25 FQs each cut into twelve charm squares. I cut all the prints without very geometrical designs on the Baby Go Cutter using the charm square die.

Given that my quilt will be made up of 300 charm squares, organising and keeping track of a layout pattern would be difficult. So I decided to sew the charms into blocks of 25. There will be twelve of these squares and I will put a charm from each FQ into each of these blocks. Since I find random placement very hard to do, I devised a dorky way of placing these charms in a random-seeming manner. I drew up a series of sudoku squares where each of the numbers 1 to 5 appear in one column and in one row. I assigned a colour to each number and then placed the charm squares in the order marked on the sudoku.

I then sewed the charms into rows, pressing the seams in each row in alternate directions so that the seams nest when the rows are sewn together. If you are a real beginner quilter on this project, grab a few scraps, cut them into 5" squares and make nine patches until you are pretty confident that your cutting, seam allowance and seam matching are pretty accurate. I pin the points where may seams match and find this helps with the seams meeting although some people prefer not to pin. I am also not excessively fussy about every single seam meeting to perfection - that decision is up to you but try to keep the piecing process enjoyable and you may not find it as enjoyable if you are unpicking more than sewing!

This gives me one block of 25 charms and I will make eleven more of these to make the finished quilt. Here is a mock-up I made of the finished quilt - I made a mosaic in big huge labs and inserted the original block twelve times but rotated in different directions.
The original idea for this quilt was the romantic notion of quilts being made in days of yore made up of squares cut from old sheets, shirts, dresses and other scraps of fabric from family life that were too worn to be any use as clothing any more. But of course, I don't have a pile of beautifully matching, 100% cotton, partially worn and used, old shirts, sheets and dresses so my fabrics were bought for the purpose and hand picked by Peg and Becca from Sew Fresh Fabrics for me. But I am still happy that the mock-up mosaic I made gives me the same scrappy, random, made-from-old-scraps feel that I was looking for but also pulls the colours from one limited palette. I can't wait to see how you all put this quilt together - whether you go random or more planned or make a different quilt altogether with your palette fabrics.
Looks gorgeous Lynne - great colour combo!
ReplyDeleteThat's a lovely palette Lynne - you should show us your inspirational pic again. I like your joining advice - I have a phrase in class that I use and it's "everyone has a different level of perfection", one person will always want to unpick where somene else will say what the heck!!
ReplyDeleteI enjoyed pulling my colours together
for my teeny version, good practice.
Lol, just love your approach to 'random' ;o) Looking fab so far!
ReplyDeleteI had decided to give the Dead Simple QAL a miss because I'm busy with other things but, now I see this, I'm very tempted. It's looking great :)
ReplyDeleteI love your random method too Lynne! It's very like my random method...i.e. there has to be a method to it ;-)
ReplyDeleteLooks great so far! Love your sudoku method!
ReplyDeleteLove your block, the colour palette is gorgeous. Such a great idea to use colour as the stepping off point. I am looking forward to making my own version, once I have finished a few other things (!) I've had my colour palette picked out since you started!
ReplyDeleteOK so I started ironing the fabric last night...maybe cutting today!
ReplyDeleteYou are quite fast!!! Gorgeous top Lynne:)
So much thinking!
ReplyDeleteAll this info is so helpful especially the sudoku layout idea. I never know how to do "random". Now I just have to come up with a plan!
ReplyDeleteLooks beautiful and your random method is great.
ReplyDeleteOh, it's looking great!
ReplyDeleteOh very interesting - I love the way you've used the BHL mosaic to show a final quilt representation.
ReplyDeleteIts looking great Lynne!
ReplyDeleteI used the solution to a standard 9 X 9 Sudoku puzzle to arrange the patches in my Clothesline quilt, because I used only nine different fabrics. Since this pattern calls for 25 different fabrics, I would use 12 grid squares of the solution to a 25 x 25 Sudoku puzzle. You can find them online by searching with "sudoku 25x25". This is much easier than creating the grid yourself.
ReplyDeleteHere's just one of many links where you can find and print the Sudoku 25 x 25 puzzles--> http://www.colinj.co.uk/Extreme%2025/25.1.html
ReplyDeleteSolutions are also provided.
Enjoy!!!
Here's a better website for printing sudoku extreme 25 X 25 puzzles, where you can choose letters or numbers--> http://www.sudoku-download.net/sudoku_25x25.php
ReplyDeleteOkay, I'm done!
Enjoy!
I love your method for this. I cut up a tonne of kona, threw in a charm pack of pips and some fq's of pips and started sewing together 5" squares in strips and after one strip I put it to one side, thinking: OMG I'm going to mess up and have too many of one design in one place if I'm not really careful. Now with this method of putting the fabrics in blocks and assembling them, it seems more manageable and I'll get the more random mix without a lot of stress!
ReplyDeleteFantastic Lynne - I am looking forward to the real one. Will you be sticking to this layout ? Will need to look at what I can manage to fit in between all the swaps I'm now doing!
ReplyDeletei love it, Lynne it looks great. i am not going to start just yet i have a couple of bee blocks to complete, and then i'll get on it. it's exciting though.
ReplyDeleteLove your palette!
ReplyDeleteWhen I was a kid we had matching bedspreads and curtains made from squares that were the leftover fabrics from clothes and other things from different generations. It was nice to lie in bed and spot the fabric from my dresses and Mum's shirts and we also used them to play I spy. I'm not from the days of yore but my mum was and they were one of the first things she made when she discovered quilting. I still have some of the leftover squares.
ReplyDeleteLove the sudoku idea, totally random...
I appreciate your solution for "random seeming" placement. Well done! I'll just be printing out the picture-- you have already done al the work. Awesome!
ReplyDeletethese colours are beautiful i really love them! x
ReplyDeleteIt looks great so far - can't wait to see it grow! I also like planning my randomness when it comes to fabric!
ReplyDeleteIt's perfect, and a fantastic way to try new and interesting colour combinations, Lynne!
ReplyDelete