
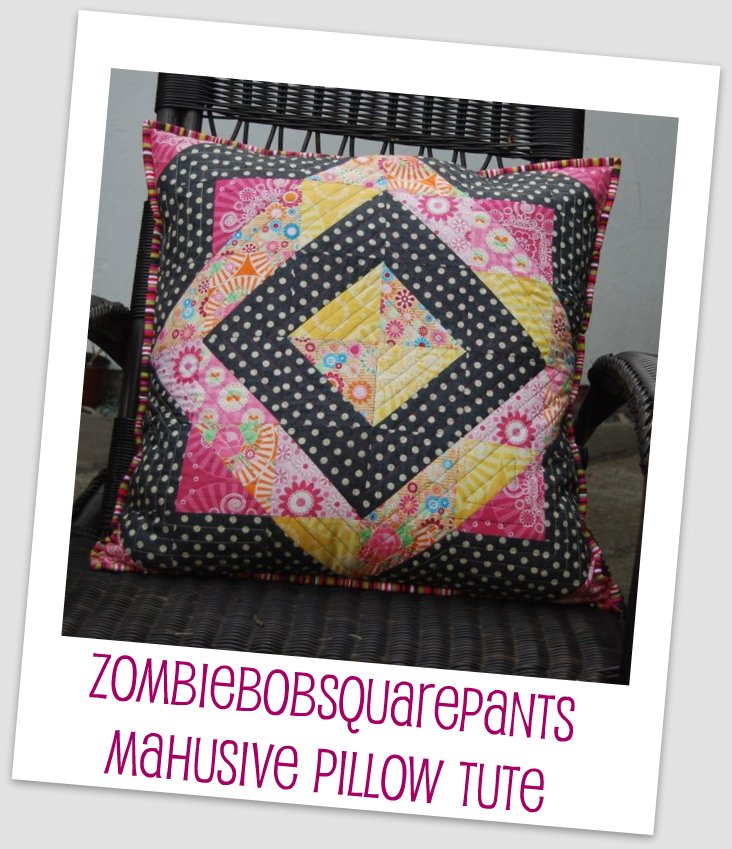
I made this pillow (my first ever pillow) yesterday and thought I"d do a quick tute for it. This pillow is a massive 24". I have called it ZombieBobSquarePants since it is made with Happy Zombie's Happy Mochi Yum Yum line.
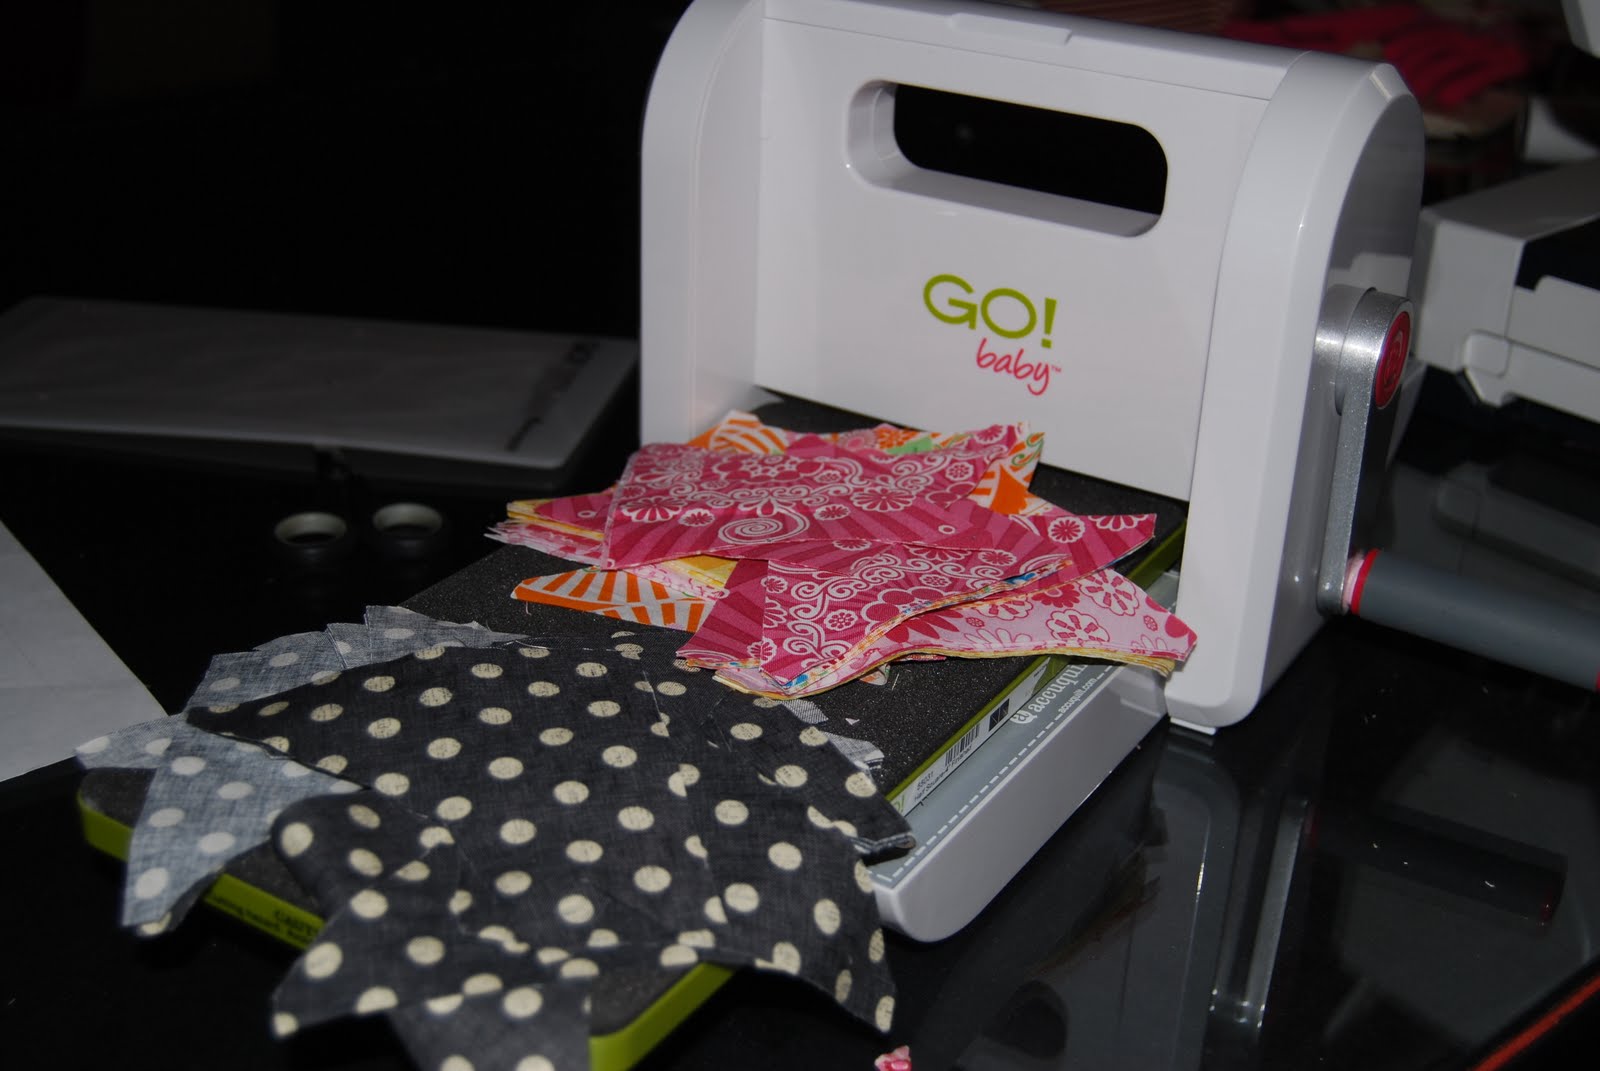
To cut my HSTs out for this pillow, I used my Baby Go Cutter and the Half Square 4" Finished Triangle dies. I have heard people say that they would not want to cut their HSTs using an Accuquilt cutter since they prefer to trim their triangles. I thought I would feel the same which is why I tried out making this pillow. And I have to say that this method is just as neat and accurate as the method where you sew squares together, cut in half, press open and trim the squares but sooooo much quicker and easier. Cutting the triangles took about 3 - 4 minutes and some of that time was fabric selection. Once sewn, the tedious trimming stage is eliminated as is the stage of trimming corner as the Accuquilt corners are pre-trimmed. I am seriously thinking of making a whole quilt of this block and I would not have contemplated it before given how slow the whole process is when you have to trim all those squares.
1. To start off, you will need to cut 32 coloured fabric HSTs, 24 background fabric HSTs and eight 4 1/2" background fabric squares.
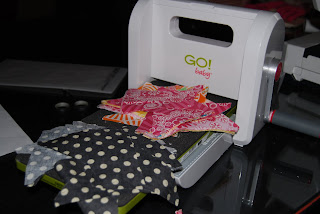
2. If you do not have a Baby Go cutter, you will need to cut sixteen 5" squares of coloured fabrics, twelve 5" squares of background fabrics and eight 4 1/2" squares of background fabric and then follow the instructions in the original LBSP tute here.
3. Sew together four pairs of coloured fabric triangles along the long diagonal line. I like to choose one darker and one lighter fabric for this bit to give the finished square some definition. Sew the remaining coloured triangles into pairs with the background fabric triangles. Press seams to the dark side. Lay out all your HST squares and neutral squares to make the pattern in the finished block.

4. Sew into rows pressing to the left in one row, to the right in the next, to the left in the next and to the right in the next so that, when you join the rows, the seams can butt up against each other. Sew the rows together and press these seams open and VOILA you have your very own [insert your own name here] BobSquarepants.

5. Choose a piece of dodgy old fabric to use as your backing fabric and cut so it is about 1" bigger than the pillow top all round. I used a piece of old sheet. This will be on the inside of the pillow and never seen. Cut a piece of batting to the same size. Lay the three pieces into a quilt sandwich and baste. Here I have my basted quilt sandwich together with my choice of quilting threads.

6. Quilt as desired. I quilted in straight lines using threads to contrast against the background. I use Aurifil 40wt on top and 50wt in the bobbin in charcoal, raspberry and variegated yellow. This was my first straight line quilting using the 40wt and I love how it stands out against the fabric - it quilted beautifully.

7. For my pillow back, I made a simple pieced square within a square block finished at 24" square with a couple of inches added on one side to allow for the insertion of a zip. I quilted this in the same way as I quilted the front. Some people just use plain, unquilted fabric on the back but I like the heavier weight of quilted fabric for a pillow. An alternative would be to use something heavier like linen, a home dec fabric or a shot cotton.

8. There are plenty of tutorials out there for pillow backs - you can use a simple envelope, insert a zipper or add buttons. I will leave you to choose which method you use to make your pillow back.
9. I then baste the pillow front to the pillow back, wrong sides together, using a long machine stitch about 1/4" from the edges of the pillow.
10. Bind the finished pillow as you would a quilt, machine sewing the binding to the front using a seam which is just over 1/4" then flipping to the back and hand sewing down. I use a 2 1/2" binding strip for this to compensate for the double thickness of the two quilted pieces together.

To cut my HSTs out for this pillow, I used my Baby Go Cutter and the Half Square 4" Finished Triangle dies. I have heard people say that they would not want to cut their HSTs using an Accuquilt cutter since they prefer to trim their triangles. I thought I would feel the same which is why I tried out making this pillow. And I have to say that this method is just as neat and accurate as the method where you sew squares together, cut in half, press open and trim the squares but sooooo much quicker and easier. Cutting the triangles took about 3 - 4 minutes and some of that time was fabric selection. Once sewn, the tedious trimming stage is eliminated as is the stage of trimming corner as the Accuquilt corners are pre-trimmed. I am seriously thinking of making a whole quilt of this block and I would not have contemplated it before given how slow the whole process is when you have to trim all those squares.
1. To start off, you will need to cut 32 coloured fabric HSTs, 24 background fabric HSTs and eight 4 1/2" background fabric squares.
2. If you do not have a Baby Go cutter, you will need to cut sixteen 5" squares of coloured fabrics, twelve 5" squares of background fabrics and eight 4 1/2" squares of background fabric and then follow the instructions in the original LBSP tute here.
3. Sew together four pairs of coloured fabric triangles along the long diagonal line. I like to choose one darker and one lighter fabric for this bit to give the finished square some definition. Sew the remaining coloured triangles into pairs with the background fabric triangles. Press seams to the dark side. Lay out all your HST squares and neutral squares to make the pattern in the finished block.

4. Sew into rows pressing to the left in one row, to the right in the next, to the left in the next and to the right in the next so that, when you join the rows, the seams can butt up against each other. Sew the rows together and press these seams open and VOILA you have your very own [insert your own name here] BobSquarepants.

5. Choose a piece of dodgy old fabric to use as your backing fabric and cut so it is about 1" bigger than the pillow top all round. I used a piece of old sheet. This will be on the inside of the pillow and never seen. Cut a piece of batting to the same size. Lay the three pieces into a quilt sandwich and baste. Here I have my basted quilt sandwich together with my choice of quilting threads.


7. For my pillow back, I made a simple pieced square within a square block finished at 24" square with a couple of inches added on one side to allow for the insertion of a zip. I quilted this in the same way as I quilted the front. Some people just use plain, unquilted fabric on the back but I like the heavier weight of quilted fabric for a pillow. An alternative would be to use something heavier like linen, a home dec fabric or a shot cotton.

9. I then baste the pillow front to the pillow back, wrong sides together, using a long machine stitch about 1/4" from the edges of the pillow.
10. Bind the finished pillow as you would a quilt, machine sewing the binding to the front using a seam which is just over 1/4" then flipping to the back and hand sewing down. I use a 2 1/2" binding strip for this to compensate for the double thickness of the two quilted pieces together.

When I had finished, I asked my son Jack which side of the pillow he preferred. He said - can I be honest Mum? I said yes, of course. He said I don't really like either side.
lol your son is so funny!
ReplyDeleteI think both sides are great but my favourite is the front!
Thanks for the tute!
I am now even more convinced than ever that you live in the Land of the Giants!
ReplyDeleteYummy yummy; Jack..Naughty spot now!
That is so like a son!! Makes it all worthwhile doesn't it?
ReplyDeleteI still love that block! Nice pillow, lovely tutorial! Gotta love your kid too, the pillow is a bit on the pink side.
ReplyDeleteIt will make it all worthwhile and absolutely shock you when he says he does like something! Was it too much pink?
ReplyDeleteAnyway we all love it!
I love both sides! And Jack sounds just like my oldest son :)
ReplyDeleteGreat tute- can't believe you haven't made a pillow before! Jack is cracking me up!
ReplyDeleteVery lovely pillow (we call them cushions here in Australia).
ReplyDeleteI have a Go Baby with a 3" HST die; I can't wait to give it a try (when I get something else finished)!
Now, I'd like to see Zombie Bob muscling in on the BOM quilt ... that would get my syn. going craaazy!
ReplyDeleteThis is wonderful Lynne, although I can't quite believe you've succumbed to the cushion thang ... has this opened the floodgates? I do hope so ...
I'd like LilysQuilts to finally banish my fear of the zip!
This comment has been removed by the author.
ReplyDeleteYour son's comment made me smile. Both the back and the front are lovely. It has never occured to me to make something more than a plain back which matches the front. Thank you for sharing the idea....I'll be keeping it in mind when I make my next cushion.
ReplyDeleteThat pillow is special no matter which side you look at it. What I love is how HSTs fool the eye. Until I saw the blocks spread out, I was totally wrong about the block construction. PS. I really love your stripy binding.
ReplyDeleteGreat pillow! Why in the world would anyone NOT want help with trimming these things????? I hate that part.
ReplyDeleteI think triangles is my next die purchase. I went for strips this month.
I'm surprised this is your first pillow Lynne, your lynnebobsquarepants block is perfect for it!
ReplyDeleteGreat tute thanks for sharing!
Beautiful pillow and I really like the binding, how cute that your son doesn't like either side.
ReplyDeletemy favorite is the front...the black dots really make the colors pop...I have that same die...I think I may try this...thanks for the tut....
ReplyDeletewell I like both sides so I guess that makes us even! :)
ReplyDelete;)
Cute pillow.
What a great looking pillow and a great size too for using as a floor cushion.
ReplyDeleteKids....bless their hearts, you gotta love them. I love the go cutter for HSTs too. Great pillow.
ReplyDeleteDamn. HSTs that don't need to be trimmed. I am becoming powerless to resist the Go!
ReplyDeleteThanks for answering my question about the HST die. It is cause for me to reconsider. I am particular about mine and was worried about it not being precise enough. Thanks for trying it out!
ReplyDeleteBetter late than never. YOU ARE AWESOME.
ReplyDeleteHugs
Pxxx