
Touchdraw is a vector graphics app for iPad which I use to design quilts, blog headers, buttons and to draw up templates and quilt assembly diagrams. I have done previous Touchdraw tutorials which you can find if you put Touchdraw into the search box on the right side bar of my blog.

Today's Touchdraw tutorial is not about making pretty pictures but about starting with some geometry and ending up with some EPP templates. Mandy has been making beautiful little mini EPP dresden plates. Justine asked for some little mini EPP templates for something she was working on. She wanted to make a mini EPP 12 leaf dresden and Jon from Touchdraw for iPad has come to the rescue to take us through the process step by step. I use the same technique to draw up all my templates - i.e. draw the outline of the geometric shapes first and then convert those into actual shapes which are then printable as templates.
1. Draw a circle.

2. Draw one vertical radius.

3. Draw three more radiuses or radii if you like a fancy latin plural.

4. Select all 4 of the lines you just drew and copy them. Use the "Group" command to group all of the lines together. Copy the grouped object to the clipboard (but do not paste yet). Use the function key feature and drag the rotation handle down 15 degrees. With the function key feature enabled, it will rotate the shape in increments of 15 degrees, which is exactly what we want since your target wedge shape has 12 pies in it, each 30 degrees.

5. Use the "Ungroup" command to ungroup the 4 lines. Use the "Paste in Place" command to paste in another group of lines:
6. Rotate this group 45 degrees. Ungroup this group of 4 lines.

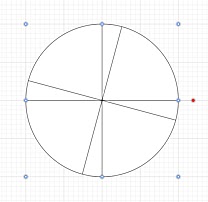
7. Use the "Paste in Place" command to paste in another group of lines. Rotate this group -15 (otherwise known as 345) degrees. Ungroup this group of 4 lines. You should now have a perfect pie that looks like this.
8. Now, since TouchDraw has a "snap to line" command which will allow you to snap to the ends or midpoint of a line, you should be able to draw lines to make perfect sized wedges since they will snap to lines we drew in earlier steps. Note: To make sure that the "Snap to Grid" doesn't interfere, you should turn it off temporarily.

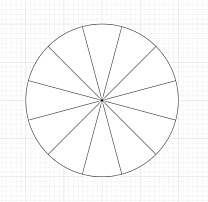
9. After a drawing a few more lines, we should end up with this.

10. Select the circle and delete it to give us our final shape:

11. Now I want to add the little points on top of the wedges. With the "path" tool, draw a rough triangle above top/center wedge: (Note: It doesn't have to be perfect).

12. Drag the lower left handle so that it "snaps" to one corner of the wedge.

13. Drag the other handle to that it "snaps" to the other corner of the wedge.

14. Turn "Snap to Grid" back on. Drag the top handle the position you want it.


16. Copy the top wedge to the clipboard. Use the "Paste in Place" command to paste the top wedge shape 11 more times. (Note: It should look slightly bold with all of the shapes drawn over each other).


19. Next add the dresden circle in the middle as a guide for that end of the templates.


21. You can then zoom right in and move each corner of the shape exactly into place so that a perfect template is created.

22. Next add a slightly larger circle for your central template.

23. You can then copy the two template shapes and paste them into a new drawing and duplicate the dresden leaves as needed. I draw a rectangle about 1" smaller than my printer paper and arrange the shapes within that rectangle which you can then print out and use for a template set.

OOOOOOh so excited - I will be getting an iPad on Tuesday and I will be downloading Touchdraw the minute I get it (well after I have said thank you, had breakfast and been to school sports day, but straight away after that!)xxx
ReplyDeleteLooks like you have a new career ahead of you.
ReplyDeleteTotally mind boggled! Very clever but scary all at the same time.
ReplyDeleteExcessively fancy pants and very impressive
ReplyDeleteVery cunning plan there!
ReplyDeleteblimey: after a couple of hours of accounts revision this morning, that has completely blown my brain!! Looks very clever
ReplyDeleteYou got it going on techno whiz :)
ReplyDeleteIt's great if you have access to touch draw. For those of us that don't it would be great if when people made available their patterns they gave us a link to EPP pattern versions too. Hint Hint!! ;-)
ReplyDeleteI was having this convo with Helen yesterday after seeing her EPP ET block. I now want to use that block EPP to match the spring carnival cushion I made. Not sure if you saw it? And now seeing the dresden I want a trio with this as the third.
Time to practice some more. I will give this a try, thank you.
ReplyDeleteOh, that's such a clever program - the possibilities seem endless! So much more accurate that faffing with a compass and a ruler...although that's also fun!! I bet we won't see Hadley for days after she downloads it on Tuesday as she'll be far too busy designing wonderful quilts and then whipping them up!
ReplyDeleteWow, i really want to try it. Could it also make supersized templates for scaling up big blocks? I once had to resort to making a big round brio train track and drawing around that to get a circle bigger than my compass would stretch! Any techie ideas on that one or i may have to retire the wheelie bin and get myself a galvinised dustbin with lid!
ReplyDeleteYikes...it looks hard, my brain is getting to old for all this "newfangled" technology. Oh, and my body isn't getting any younger either.
ReplyDeleteWhat Marianne said. I downloaded the app ages ago and have never evened opened it. Not once. I just scrolled through these images/instructions and felt a sudden sense of panic that maybe there was going to be an exam in the next post. Maybe one day this summer I'll give my pea sized brain a little workout and give TD a try.
ReplyDeleteGod I think you could go straight from being a quilter to being an architect, skipping 7 years of hard study.
ReplyDeleteWhat Poppyprint said. Oh, except I actually opened it. Once.
ReplyDeleteUghhhhhh. I've tried to get the triangle part to work for hours with no luck. Clearly I'm missing something. So close!
ReplyDeleteI sooooo love you!!! Thanks sew much for this series of tutorials. I adore my ipad and have had this app and not known how to use it with any degree of success. Now that i have found you I will be hungrily awaiting the next, next and next installments of this tutorial series. Cheers, Karen
ReplyDelete