
So do you fancy having a play with a simplified version of this block? As it makes a big block of my mini version of the Georgetown Circle, it's called Big Little George. It's a fun block to make and a great way to practice some paper piecing - a good scrap buster too. I haven't given fabric requirements - just grab scraps as you go or use bits of FQs as I am doing. The other posts for this QAL can be found here: Post no 2, Post no 3, Post no 4. As usual, add any in progress or finished pics into the Flickr group.

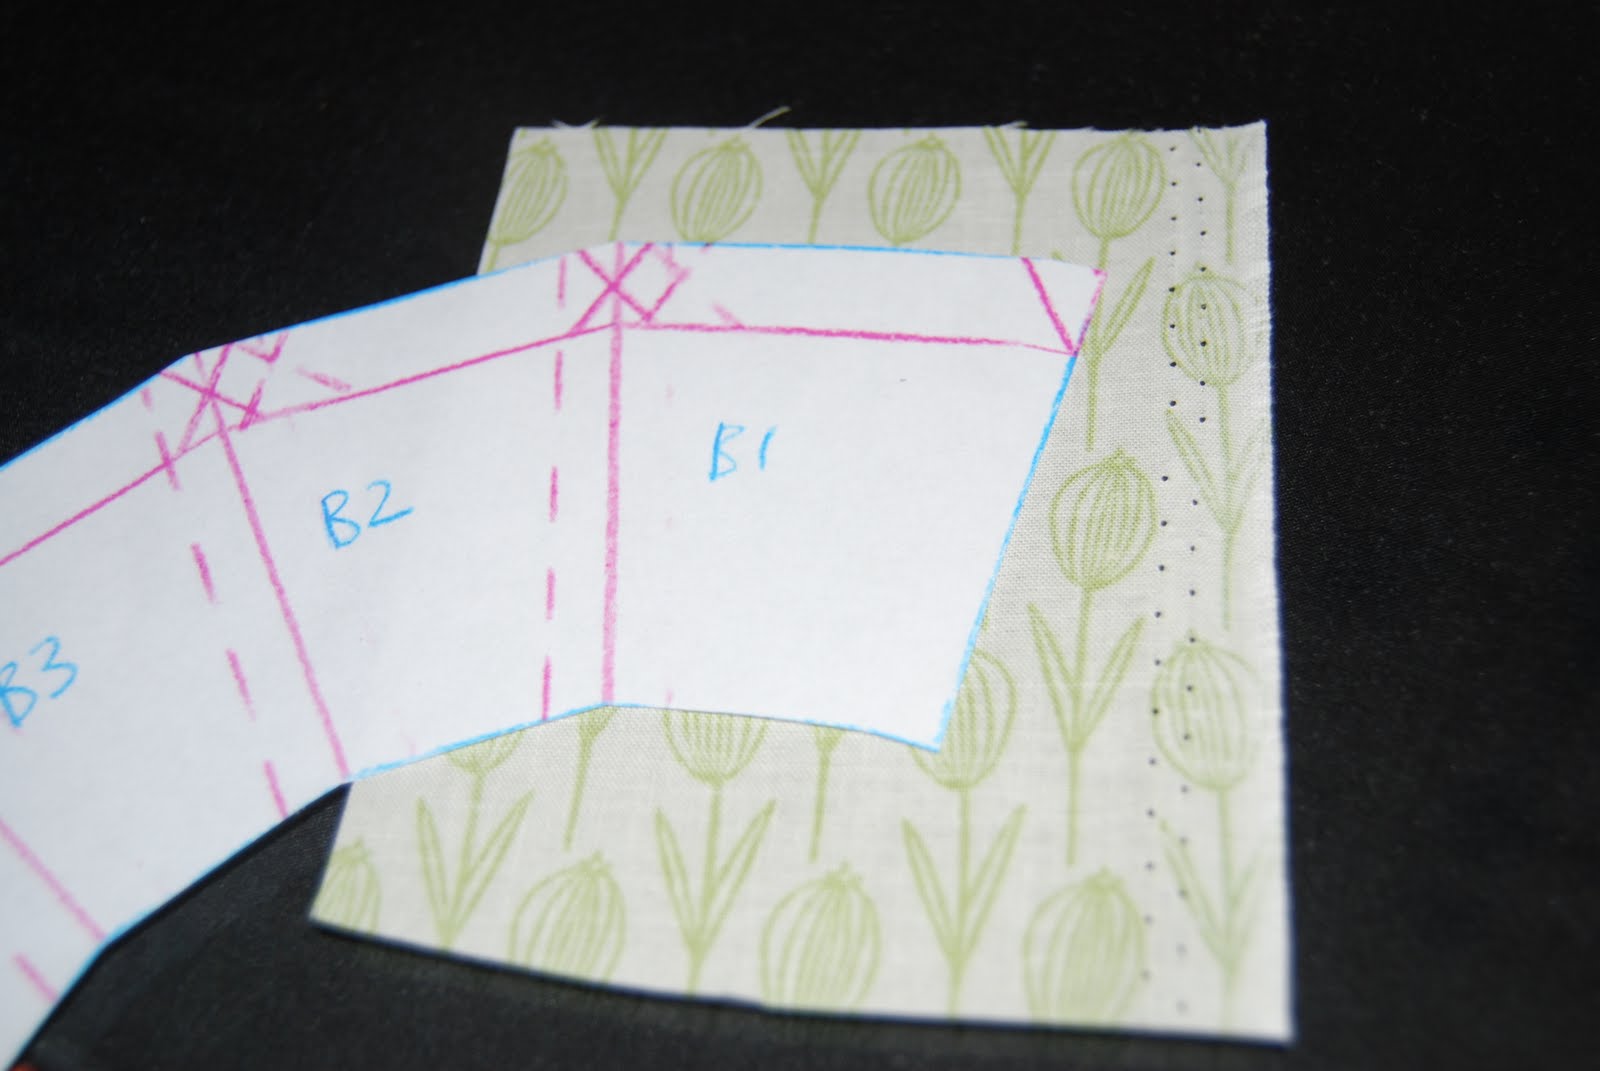
Click here for the template and start off by printing four of these out for this post (although you will need eight for the whole block). The long side of the square in the block should measure 8", 8 1/2" or thereabouts - mine printed out at 7 3/4" and I'm going with that. Don't worry too much if it doesn't print out bang on, near enough is fine. I will be doing this tutorial in parts starting with section B.
1. Cut out one section B along the blue lines - keep the piece of paper left behind as you will use this for template C later on.
TOP TIP: your final block will be the reverse of the block in front of you so, when you flip the finished block over, B1 will be on the left and B4 on the right. Bear this in mind when picking you fabrics.

2. Take your first piece of fabric (B1), cut it (with scissors) a bit bigger all round than the B1 shape on the template and pin it or glue it to the template. You want the printed side of the paper facing you with the B1 fabric facing right side down, away from the paper. Make sure it is pinned to cover all the lines of B1 all the way up to the dotted seam allowance line.
3. Take your second piece of fabric for B2. I do not cut this piece but just bring the whole FQ to the template and line the template up along the side of the fabric. This second piece should be right side towards the paper and you still have the printed side of the paper facing up. I pin the paper and two pieces of fabric together.

4. Set your machine to a short stitch (I set to 1.5). Sew along the solid line - don't worry about 1/4" seams or any of that malarkey just drop your needle in at the start of the line and sew until you get to the end of the line then stop. Here is the seam you will have sewn.

5. Flip the new piece of fabric over and press it flat. It needs to cover the whole of section B2 including up to the dotted seam allowance line. My piece easily does because I used a whole fat quarter but you need to be more careful if you are using small scraps.

6. Flip the block over and roughly trim using scissors. You can also roughly trim the seam allowance to 1/4" using scissors.

7. Now start the process all over again. Line up a new piece of fabric along the seam allowance line, right side up.

8. Sew along the solid red seam line, flip the new fabric over and press, making sure it cover the whole of the B3 segment all the way up to the seam allowance line.

9. Roughly trim the new fabric around the B3 segment and roughly trim the seam allowance of the new seam to 1/4" ish.

10. Repeat the process with a new fabric for B4. Line it up right side down, sew along the solid line, flip, press, roughly trim around block and roughly trim seam allowance.

11. Now, using a pair of scissors, cut off all the excess fabric along the edges of the paper template so from the printed side, you cannot see any fabric.

But it looks like this from the fabric side.

12. Now tear away the pieces of paper along the perforations and discard.

13. Voila, you have your first of four paper pieced B segments. Make three more and wait for the next installment of Big Little George.
oh you make this so simple....ty
ReplyDeleteI think I can I think I can...
ReplyDeleteWoop! This looks totally doable - off to the scrap bins I go!!
ReplyDeletethanks!!!! Creo que hasta aqui voy a poder ..
ReplyDeleteTemplates printed and cut out. It wasn't until now that I realized why eight copies need to be printed--it's because the A and B sections overlap on the templates. C sections can be cut from the same printouts used to cut the B sections, since they do not overlap.
ReplyDeleteYou explain things SO well Lynne...are you sure you weren't a teacher in another life??? Now if I can just get this printed off!!! (At least SuzBob is done!)
ReplyDeletemmm, it doesn't look that scary :)
ReplyDeleteAlrighty then. Going to try it.
ReplyDeletethanks so much for posting this tutorial, I just love the block and I'm making it for a swap at my local modern quilt guild!
ReplyDeleteHow fun! Off to try it out - Thanks!
ReplyDeleteThank you, you do make it seem relatively easy to do, I'll give it a try.
ReplyDeleteOKAY! I'll be trying this out tomorrow! Thanks.
ReplyDeleteI think this is going to be so cool!
ReplyDeleteBeautiful! I'll have to come back on a day I can play.
ReplyDeleteSo far so good, but until I find (or purchase a new) cord for my camera, I can't post any pics. :(
ReplyDeleteMy "B" section is finished. Thanks so much. I forgot how much I like paper piecing.
ReplyDeleteHi again! How often will you be posting the tutorials for this block? I want to pace myself. :-)
ReplyDeleteI am starting this at Saturday Sew....I can't wait!!!! Thanks for your wonderful tutorial!
ReplyDeleteI'm having a great time sewing along with this tutorial. What is the finished size of the original "Little George"?
ReplyDeleteOkay stupid question time. I can't get the template to print out square. The edge left to right is always smaller than top to bottom. I can get all sorts of different sizes by altering the settings, but it's never square.
ReplyDeleteIs this deliberate? Does it matter? Sorry Lynne, but there's always one!